Thursday, August 30, 2012

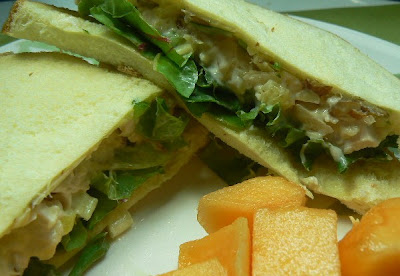
Tropical Chicken Salad Sandwiches

We love the combination of flavors in this sandwich filling. The pineapple gives this slight hint of sweet along with a marvelous texture. The sesame oil along with ground ginger gives just a hint of Asian flavor too which is a really popular flavor profile at our house. And then there is the lovely crunch of the sliced almonds. I really love these.


Tropical Chicken Salad Sandwiches

1 (8 oz) can crushed pineapple, juice pack
1 teaspoon cornstarch
¼ cup mayonnaise
1 teaspoon dark sesame oil
¼ teaspoon ground ginger
¼ teaspoon salt

1 cup chopped cooked chicken
¼ cup chopped green pepper
¼ cup  sliced almonds (toasted)
2 sliced green onions

bread
lettuce

In a small saucepan combine the canned pineapple (with the juice) and the cornstarch, heat over medium heat until thick and bubbly. Cook and stir 2 more minutes.

Transfer to a medium bowl and allow to cool to room temperature

When pineapple is cooled to room temperature add the mayonnaise, sesame oil, ginger and salt and stir to combine.

Add chicken, green pepper, almonds and green onions.

At this point the mixture can be stored in the fridge for up to 1 week.

I like to add lettuce to these sandwiches when serving.

Makes 3 to 4 sandwiches.

Wednesday, August 29, 2012

Greek Chicken Pasta


I have made an observation this last month or so while posting recipes to this blog. We eat a lot of foods that are inspired by the flavors of Greece and the Mediterranean, at least in the summer. I love the flavor profile of that area: olive oil, olives, Feta cheese,tomatoes all of these flavors are so wonderful especially in the summer months.

This pasta dish is great anytime of year and works equally well with either chicken or turkey. Most of the ingredients are things that are always on hand at my house so I can make this when I don't want to make a trip to the store. Also it is just impressive enough to serve to guests so it is a perfect dish to pull out when you get unexpected guests around meal time.

The only down side to this dish in my opinion is that some of the ingredients are a bit on the pricy side (sun dried tomatoes, kalamata olives, artichoke hearts) I do try to watch for sales on these ingredients so I can get them for less and just have them when I need them. I do admit to a bit of sticker shock when I went to make this for the blog picture. I had run out of sun-dried tomatoes and had to buy them at regular price but that got me to thinking how do I use these ingredients to really make them stand out. First off don't chop them up too finely! I know there is a school of thought that if you chop them up really finely then you get a little bit in every bit. I say NO! cut them in larger pieces so they really show up. I would rather see fewer large pieces of these ingredients than to have tiny bits of stuff I can't identify in every bite. So I just cut the olives each in half they show up so much better that way. Then I cut the rest of the expensive stuff into about the same size pieces.

Also I used the marinade from the artichokes as the base for my vinaigrette for our salad. I simply added some extra virgin olive oil, a bit of balsamic vinegar and some dry herbs. After all you paid for both the artichokes and the marinade they come in.


Also in this recipe (like in many of my recipes) I make the white sauce in the microwave. I do this all the time, it is practically fool proof and really pretty fast.


Greek Chicken Pasta

½ pound uncooked dry penne pasta
¼ cup butte
1 cup chopped onion
¼ cup flour
1 (14 0z) can chicken broth
1 cup (about 4 oz) crumbled Feta cheese
3 cups (approximately, use what you have) chopped cooked chicken or turkey
1 (6 oz) jar marinated artichoke hearts, drained and chopped
½ sun-dried tomatoes (oil packed) drained and chopped
1/3 halved kalamata olives
2 Tablespoons chopped fresh parsley
1 Tablespoon chopped fresh oregano

Preheat the oven to 350 degrees Fahrenheit

Grease an 11”x7” casserole dish

Cook pasta as directed on package.

Meanwhile melt butter in a microwave safe bowl in the microwave (about 30 seconds to a minute)
Add onion to butter and heat in microwave on high for about 2 minutes at a time until soft and starting to cook through.

Add flour, stir well and heat in microwave for 30 seconds.

Stir in chicken broth. Microwave on high at 1 minute, stir and repeat until mixture starts to bubble and thicken.

Combine all ingredients and put in prepared casserole dish.

Bake uncovered 25 to 30 minutes until hot.

Garnish with additional parsley and oregano if desired.


Tuesday, August 28, 2012

Three Potato Medley

I know I have already shared a few potato side dishes that are cooked on the grill. That's because I make a lot of them, especially in the summer. I love to have as much of the meal coming off the grill as possible. It is just easier, it's tastier and it saves me time.

This one is a little bit faster because we start cooking the potatoes in the microwave before we put them on the grill.

You will need some kind of grill basket to cook the potatoes this time but I use my grill baskets for so many different things. If you don't already have one and you grill very often you really need to check them out.

The three potatoes in this recipe are small red potatoes, Yukon golds and a sweet potato. The flavors of these go so well together and when you add your favorite barbecue sauce and the smokey flavor from cooking on the grill it would be hard to find a better side dish.

As for the barbecue sauce use whatever you already have/ love. I have made these with several different sauces and it is always good.

If you don't have the frozen pearl onions called for, just substitute a handful of cut up green onions. They are wonderful here too.


Three Potato Medley

½ lb small red potatoes, cut into bite size pieces
½ lb small Yukon gold potatoes, cut into bite size pieces
1 medium dark-orange sweet potato, cut into bite size pieces
1 Tablespoons barbecue sauce
1 Tablespoon fresh lemon juice
1 Tablespoon oil
1 teaspoon fresh sage (if you have it, totally optional)
1 small green pepper, cut into bite size pieces
16 frozen pearl onions, thawed (or a handful of green onions cut-up)

Heat grill and grill basket

Place all the potato pieces in a shallow microwave safe dish and cover. Cook on High for 8 to 10 minutes (stirring once) or until tender. Be sure to check the sweet potato, it takes the longest to cook. Cool slightly

Meanwhile in a bowl combine the barbecue sauce, lemon juice, oil and fresh sage. Add potatoes, green pepper and onions and stir to coat.

Carefully put the potato mixture in the hot grill basket.

Cook over medium coals 10 to 15 minutes until potatoes are cooked through and nicely browned. Stir 2 or 3 times while cooking

Monday, August 27, 2012

Jicama Orange Salad


What’s not to love about a jicama? They are wonderfully refreshing and crunchy they pair with almost any other flavor.

This salad is a wonderful mixture of cold, crunchy jicama, juicy orange and wonderfully creamy avocado. It pairs well with the flavors of the southwest and soothes the palette if the rest of dinner is a bit on the spicy side.

I know once you try it this salad will become a regular on your menu.


Jicama Orange Salad

2 cups cubed and peeled jicama
2 large oranges, peeled, halved and sliced
½ cup orange juice
2 Tablespoons chopped cilantro
½ teaspoon salt
1 large avocados (or 2 small ones), pitted, peeled and cubed

In a large glass or plastic bowl combine everything except the avocado, mixing well.

Cover and chill until serving time, at least 3 hours.
Just before serving add the avocado mixing in gently.

Friday, August 24, 2012

Pineapple Peanut Butter Sandwiches

Here is another of my sandwiches that can be made ahead and frozen to put into the lunch bag/box. I really love these time saving recipes. And the bonus of saving me time on busy mornings really is just what I need so often.

This sandwich is for your peanut butter lover. As a mom I love that it is sweet without all the sugar from jelly or jam or honey. By mixing in the crushed pineapple and some shredded carrot you are giving a little boost to the nutrients in the sandwiches and if you have kids that don't like veggies this is a great way to sneak some in on them.


Pineapple Peanut Butter Sandwiches

2/3 cup crunchy style peanut butter
1 (8 oz) can crushed pineapple in juice, well drained
1 medium carrot, shredded (about ¼ cup)
2 oz cream cheese, softened


Combine all ingredients in a medium bowl and combine with an electric mixer.

Sandwiches made from this can be frozen for up to 1 month.
Place frozen sandwich in lunch bag and it should thaw in about 4 to 6 hours at room temperature.

Makes 4 sandwiches

Thursday, August 23, 2012

SW Patty Melt

We love these sandwiches and they are a wonderful change up to the normal burger. Face it by the end of the summer we all get a bit bored by just a burger. We love the combo of the slightly spicy (and it really is slightly, my son thought they needed more spice) with the garlic Texas Toast.

The Jalapeno Ranch Sauce makes way more than you will need with the burgers but it is just so good. We use it to dip fries or veggies in. It is also a fantastic salad dressing. It is best to make this sauce up and let the flavors marry in the refrigerator for about an hour before using


SW Patty Melt

Jalapeno Ranch Sauce

¼ cup mayonnaise
1 fresh jalapeno pepper, seeded and finely chopped
1teaspoon fresh lemon juice
1 teaspoon chopped fresh parsley
1 teaspoon chopped fresh dill
1 teaspoon chopped fresh chives
dash garlic powder
dash onion powder
salt and fresh ground pepper to taste


SW Patty Melt
1 lb ground beef
grill seasoning, (your favorite brand)
3 thick (¼”) slices of red onion
olive oil
6 slices frozen Texas toast garlic bread
3 slices Pepper-Jack cheese
guacamole


Combine all sauce ingredients in a small bowl.

Prepare grill

Form ground beef into 3 patties and season both sides with you favorite grill seasoning.

Coat the onion slices with olive oil

Cook the beef patties and onion slices on grill over medium coals for about 15 minutes turning once.

Add cheese to meat patties and heat Texas toast on grill following instructions on package.

Serve with Jalapeno Ranch Sauce and guacamole.


Wednesday, August 22, 2012

Parmesan Potatoes and Carrots in Foil

Here is another recipe for potatoes in a foil pouch to cook on the grill. I do lots of different recipes like this and this one is always very popular.

I like the ease of cooking the potatoes in the foil right next to the main dish on the grill. Everything can be cooked out on the grill and it keeps in out of the hot kitchen on a hot day. Especially nice when entertaining guests in the summer.


Parmesan Potatoes and Carrots in Foil

¾ lb small red potatoes, unpeeled and cut into bite size pieces
¼ lb baby carrots, halved lengthwise
½ medium onion, grated
2 Tablespoons olive oil
½ teaspoon dry Italian herb seasoning
½ teapoon lemon peppercorn
½ teaspoon salt (or to taste)
2 Tablespoons shredded Parmesan Cheese
2 Tablespoons chopped chives

On an 18”x12” piece of heavy duty aluminum foil layer everything except the chives in the order given. Wrap the foil up to form a pouch. Cook on medium grill for 45 to 50 minutes or until vegetables are all tender.

Sprinkle with chives just before serving.

Tuesday, August 21, 2012

Fresh Peach Ice Cream

We love ice cream at our house, but then again who doesn't? Ice cream is a nice quick dessert especially on a hot day. However have you ever read the ingredient list on some of those cartons? There are some things in those lists that I would rather not eat. Ice cream should be a simple food, very few high quality ingredients that allow you to really taste what is in the bowl.

I've owned one of those countertop ice cream makers that you freeze the bowl and then assmeble the ingredients and plug the machine in for many years. I still use it although it doesn't have the power to make a good thick ice cream. A few months ago I noticed one of the local stores had an electric ice cream maker on sale, the kind you layer ice and salt in but with a motor. Since it was on sale for a fantastic price I grabbed one. We have been making ice cream with it since and it is so much better than any ice cream we have eaten before.

This time I got some wonderful fresh peaches at the store and so we made some peach ice cream. This ice cream only calls for 5 ingredients, all wonderfully fresh and flavorful. The end result is a sweet creamy ice cream that tastes like peaches and cream. No odd flavors, not added chemicals just basically peaches and cream.

The recipe here made about 2 quarts in machine so if your ice cream maker is smaller you can adjust the amount easily.


Fresh Peach Ice Cream

4 fresh peaches, peeled
¾ cup sugar
1 quart heavy cream
1 ½ Tablespoons vanilla extract
pinch salt


Cut up the peaches and using a food processor combine 3 of the peaches and the sugar and chop fairly finely. Add the fourth peach and pulse just to chop a bit.

Combine all the ingredients and add to the canister for your ice cream maker.


Follow the directions for your ice cream maker to set up and make the ice cream.

Monday, August 20, 2012

All in One Breakfast Muffin

This recipe is packed with energy (quite a few calories too unfortunately) and gives you all the breakfast favorite foods in an easy to pack, on the run breakfast. I love it as a change from the typical sweet muffin. This one is definitely savory not sweet. They will keep for a couple of days in the fridge and just require a few seconds in the microwave to take the chill off before you run out the door. They are great if you have someone in the house that needs a really quick breakfast that will fuel them for the entire morning.


All in One Breakfast Muffin

2 cups all purpose flour (you can use half whole wheat if desired)
¼ cup sugar
4 teaspoons baking powder
¼ teaspoon salt
1 cup milk
¼ cup vegetable oil
2 eggs (1 for the muffin batter and 1 for the filling)
1 (8 oz) package cream cheese (room temperature)
¼ shredded cheddar cheese
¼ seasoned salt
4 strips of bacon that have been cooked, cooled and crumbled

Preheat oven to 425 degrees Fahrenheit

Grease a 12 cup muffin pan and set aside

In a medium bowl combine flour, sugar, baking powder and salt.

In a small bowl combine milk, oil, and 1 of the eggs.

Pour the liquid mixture into the dry mixture and combine. Divide the batter amoung the cups in the muffin pan (I use my ice cream scoop for this job).

In another bowl beat the cream cheese until smooth, add the egg and beat to combine. Add the cheddar cheese and seasoned salt and mix together. Carefully stir in cooked bacon.

Add about 2 teaspoons of this filling to the top of each muffin.

Bake in preheated oven for 15 to 20 minutes or until golden brown and they test done with a toothpick.

Serve warm (store leftovers in the fridge)

makes 12 muffins

Friday, August 17, 2012

Peanut Butter Chocolate Chip Pound Cake

This pound cake is always popular no matter where I take it. I mean how could I miss with peanut butter and chocolate? Because this pound cake starts as a simple cake mix it is extra quick to put together so it is perfect for so many occasions. It also travels well, making it a great choice for potlucks and picnics.

I think a lot of us have a bundt pan in the cabinet and many are afraid to use them. All those nooks and crannies look like it would difficult to get a cake out of the pan. As long as you coat the inside surface really well with shortening and then coat that with some flour you really shouldn't have any problems. The pan does produce such a pretty cake shape it is well worth the effort.

Not only does the garnish of chopped peanuts tip off everyone that the cake contains peanuts but the saltiness along with the sweet is so wonderful.


Peanut Butter Chocolate Chip Pound Cake

Cake:
1 (about 18 ¼ oz) package yellow cake mix
1 cup milk
½ cup creamy peanut butter
1 teaspoon vanilla
3 eggs
1 (12 oz) package mini chocolate chips

Icing:
¼ cup creamy peanut butter
1 (6 oz) package (1 cup) choc late chips


Garnish:
2 Tablespoons chopped peanuts


Preheat oven to 350 degrees Fahrenheit

Grease a 12 cup Bundt pan with shortening (generously coating) and then lightly flour.

Combine cake mix, milk, peanut butter, vanilla, and eggs in a medium bowl. Mix on low with electric mixer for 1 minute to combine, scraping bowl often. Beat on medium speed for 3 minutes, scraping bowl a few times.

Stir in the mini chocolate chips and pour batter into prepared pan.

Bake in preheated oven for 45 to 55 minutes or until cake tests done and top springs back when touched.
Cool in pan on a wire rack for 10 minutes. Turn cake out onto wire rack and completely cool.

When cake is completely cooled, combine peanut butter and regular chocolate chips in a microwave safe bowl. Heat in microwave for 30 on high, stir until smooth. You may need to microwave a few more seconds if not melted.

Drizzle cake with peanut butter- chocolate chip mixture so that it runs down the sides. Immediately sprinkle with chopped peanuts

Thursday, August 16, 2012

Greek Burgers

Okay so here is the version of Greek Burgers we have been making for a few years now. I have played around with a recipe I found somewhere (no idea where now) and this is what I've come up with.

I really like to serve these in the Greek Pita flat bread This is the kind of pita bread that does not have a pocket it is like you get at the Gyros place at the mall.

I usually wrap the burgers in parchment paper but when I got out my box of parchment when I made these I found an empty box. When this happens you can either wrap them in aluminum foil or wax paper like we did, whatever is handy.


Greek Burgers

Sauce:
1 (5.3 oz) container plain Greek yogurt
1 Tablespoon chopped fresh dill
1 Tablespoon chopped fresh mint
1 small clove of garlic, minced very fine or grated on a micro-plane
½ teaspoon salt
freshly ground pepper to taste

Burgers:
1 lb ground beef (or lamb)
¼ cup crumbled Feta cheese
½ medium onion grated
1 Tablespoon chopped fresh oregano
½ teaspoon salt
1 clove garlic, minced very fine or grated on a micro-plane
3 (8” to 10”) Greek Pita flat bread
6 slices tomato
6 to 9 thin slices cucumber

Combine all the sauce ingredients in a small bowl and refrigerate until serving time. This can be done earlier in the day if desired.

For the burgers combine the ground meat, cheese, onion, oregano, salt and garlic in medium bowl. Mix gently to combine. Divide into 3 even portions and form into patties that are about 2 or 3 wide, 4 to 6 inches long something that will fit the center of your pita bread.

When ready to cook place on a medium grill and cook about 15 minutes or until cooked through turning once. These can be cooked equally well in a skillet too.

To serve:
Spread some of the sauce in the center of the pita bread, top with cooked burger and the vegetables. Fold the sides of the bread over and wrap with parchment paper.


Wednesday, August 15, 2012

Hobo Potatoes

I'm not sure where the name for these came from, I have to assume it is because of the fact we are cooking them in a foil pouch. These potatoes make a quick side dish because you start the cooking process in the microwave and end in a foil pouch on your grill.

I really like the combination of flavors in this the onions, carrots and celery all add so much to the potatoes so it is a nicely balanced dish. And the addition of bacon according to my son makes it perfect, I swear that boy would eat anything if I put bacon it though. LOL


Hobo Potatoes

2 cups cubed, peeled potatoes
1 cup chopped onions
1 cup thinly sliced carrots
½ sliced celery
2 Tablespoons water
½ teaspoon water
1/8 teaspoon freshly ground pepper
8 slices cooked, chopped bacon
2 Tablespoons butter

In a medium size bowl combine the potatoes, onions, carrots, celery and water. Cover and cook on high for 5 to 6 mimutes just until the vegetables start to cook. Drain and season with salt and pepper and stir in the bacon.

Cut a sheet of heavy duty aluminum foil about 18”x18”
Place potato mixture on foil and fold up to form a closed pouch. Be sure to leave a bit of air space.

Immediately place on a medium hot grill and cook for 25 to 30 minutes or until vegetables are tender.

Be careful of the steam when opening the foil pouch.

Tuesday, August 14, 2012

Deviled Ham Sandwich

Okay, for me a simple can of deviled ham is like a time machine. When the lid is popped and that aroma hits the air my mind goes back to elementary school. I guess a lot of us must have carried deviled ham sandwiches because my travels there in an instant.

This little sandwich is another that you can make ahead and stock the freezer with. I love to take them with me when I have a busy day. If I don't grab something in the morning I have a really bad habit of skipping lunch if I get busy. If I have one of this luscious little sandwiches with me I can eat on the run.

The peppers, cream cheese and hot sauce blend so nicely with the deviled ham and bring both flavor and texture interest to what can otherwise be a rather boring sandwich filler.

Remember these will only keep in the freezer for about a month but I never have any trouble eating them up way before that time period is over. 


Deviled Ham Sandwiches

1 (4 ½ oz) can deviled ham
1 (3 oz) package cream cheese, softened
2 Tablespoons chopped green bell pepper
2 Tablespoons chopped red bell pepper
Dash of hot sauce (however much you like)
6 slices sandwich bread

In a small bowl combine the deviled ham and cream cheese and mix thoroughly. Add the chopped peppers and hot sauce and combine well.

Spread onto three of the bread slices, top with the other 3 slices. Wrap sandwiches individually and label.

Freeze up to 1 month

On the day you want to serve the sandwich place one frozen sandwich in lunch bag to thaw at room temperature (allow 4 to 6 hours) or thaw overnight in fridge and carry in an insulated bag or refrigerate until lunch.

Makes 3 sandwiches

Monday, August 13, 2012

Corn Pancakes

I think all of us are on the lookout for new breakfast ideas. I love a good pancake to start the day and these are wonderful. The little bites of bacon are an added treat and the flavors of the corn and bacon paired with some maple syrup are a fantastic way to start any day.

I like a relatively thick pancake so that is how I developed this recipe. If you like your pancakes thinner then cut back on the flour to get the texture you like best.

I debated if I should use the bacon fat in the pancakes but decided to just use it to coat my pan to cook the pancakes in. I felt with the bits of bacon in the pancakes they didn't really need the bacon fat but feel free to substitute it for the vegetable oil in the recipe.

I always use my favorite cast iron skillet to cook my pancakes and if you have one be sure to dig it out for these. It really is the perfect pan for pancakes (and much more). If you don't have a cast iron skillet you really need to look into getting one. I do admit though they are a long term commitment because they need to be used for years before they really come into their own and show you how wonderful they can be. 


Corn Pancakes

2 slices bacon diced small (about 1/4” cubes)
1 egg
1 ¼ cups buttermilk or soured milk (put a couple of tablespoons of lemon juice in a measuring cup and milk to make 1 ¼ cups and allow to stand until slightly thickened)
¼ teaspoon baking soda
¾ cup flour
¾ cup cornmeal
2 Tablespoons vegetable oil
1 Tablespoon sugar
1 teaspoon baking soda
½ teaspoon salt

Cook the bacon until crisp then drain on a paper towel. Save the bacon grease to use to grease your pan to cook the pancakes.
Beat the egg until well combined and then beat in the milk and baking soda. When these are well combined add the rest of the ingredients including the cooked bacon and beat until well combined.

Heat your pan and use a pastry brush to coat the pan with some of the bacon grease.

Serve hot with butter and maple syrup.


Friday, August 10, 2012

Apple Waffle Cookies


I remember making these cookies for my older sons when they were little. I had forgotten all about the recipe until I went in search of my Cookie Dough Brownies a while back. This recipe was tucked in with the brownie one. I remembered how much everyone had loved these so I decided to make them again.

Then the debate began. Should I post the recipe here or not. You see I ran into a few problems while making them this time. I don't remember having any issues at all way back when I made them before. I think the problem is, my new waffle maker. You see back then I had one of those big old flat ones that makes the flatter waffles. Not much to look at but very tasty. A while back that old waffle maker gave up the ghost. When picking the new one I chose to go with one of the ones that makes the thicker waffles with bigger holes. More like a Belgian Waffle but not quite that thick. Hench the problem with the cookies.

Now the cookies still taste fantastic. They are apply and cinnamony and just wonderful. However at least half of mine broke when I removed them from the waffle maker. I did discover that if I gave the bottom plate of the waffle maker a good spray with no-stick spray before I poured in the batter each time it worked better. I also sprayed the top plate after every other cookie. The original recipe said my cookies should be cooked in 1 ½ to 2 minutes. Mine took 2 ½ another reason I think the thicker waffle maker was my problem.

So we have a lot of very cute waffle shaped cookies and a bunch of broken cookies. Do the broken ones look as good, no but they taste just as good. So it is up to you.

These are also a cookie that will take you some time to cook. My waffle maker only makes 2 waffle squares and I found I could only cook one cookie in each square, so that meant cooking off 2 cookies at a time. The recipe makes about 3 dozen, so it took a while.

My youngest son says it was well worth all the work but, as far as I remember the only work he did was eat them. Oh well, I'll probably make these again pretty soon they are that good.


Apple Waffle Cookies

1 ½ cups dark brown sugar
½ cup (1 stick) butter, softened
2 eggs
1 teaspoon vanilla
1 ½ cups all purpose flour
1 teaspoon baking powder
1 teaspoon cinnamon
½ teaspoon salt
¼ teaspoon nutmeg
½ cup shredded apple (I used a granny smith)
½ finely chopped pecans

½ cup powdered sugar
¼ teaspoon cinnamon

Heat waffle iron

Beat the brown sugar and butter together until well creamed. Add the eggs and vanilla and mix well again.

Add the flour, baking powder, 1 teaspoon cinnamon, salt and nutmeg and mix until well combined.

Add the shredded apple and chopped nuts and stir carefully to combine.

On a small plate combine the powdered sugar and ¼ teaspoon cinnamon and have ready for when cookies are baked.

Spray the waffle iron with no stick spray and drop dough by heaping teaspoon (I used my smallest cookie scoop) close waffle maker and cook for 1/12 to 2 ½ minutes or until done.

The cookies will still be very soft and fragile at this point. Carefully remove the cookies to a wire rack to start to cool, allow to cool 1 minute (this allows them to firm up just a bit) after this minute dip the baked cookie into the powdered sugar mixture to lightly coat.

Allow to cool completely on wire rack.

Repeat for remaining cookies.

We go about 3 dozen cookies total.


Thursday, August 9, 2012

Honey Glazed Chicken Thighs


I think we are all always looking for new chicken recipes. I was so happy to find this one because it is super easy and uses things I always have on hand. So this is a great dinner for those days when you just don't want to have to go to the store, or maybe a day when someone has unexpectedly dropped in. It is a simple one to make more of, just increase the number of chicken thighs you need based on the appetite of those eating. Double or triple the sauce and you are set. I usually serve this with a simple salad and a side of rice or couscous.


Honey Glazed Chicken Thighs

¼ cup honey
2 Tablespoons Soy sauce
2 cloves garlic, minced (or grated)
4 boneless, skinless chicken thighs
2 Tablespoons olive or vegetable oil
¼ teaspoon salt
¼ teaspoon freshly ground pepper

Combine the honey, soy sauce and garlic and set aside for later.

Brush chicken thighs with the oil and season with salt and pepper.

Cook on charcoal grill 6 to 8 minutes until the chicken is almost cooked through

Begin brushing the honey glaze on the chicken. Turn and glaze several times and cook for 2 to 4 minutes more, or until the chicken is cooked through.

Wednesday, August 8, 2012

Broccoli Salad with Bacon


According to all my kids everything is better with bacon. I think that is what first drew me to this salad. We do eat a lot of broccoli at our house, both cooked and raw so this salad was a natural.

I love to have this on hand in the fridge on a hot day to pull out alongside whatever protein is coming off the grill that day.

You could probably use a fancier vinegar in this one but I really like the flavor of the old fashioned cider vinegar in it. For some reason it just goes so well with all the other flavors especially the bacon I think.

There is just enough red onion to give a bit of a bite but not enough to jump up and slap you when you take a bit. The sweetness of the raisins also plays really well with everything else in the bowl.


Broccoli Salad with Bacon

½ cup mayonnaise
1 Tablespoon sugar
2 Tablespoons cider vinegar
3 cups broccoli florets
1/3 cup raisins
¼ shredded cheddar cheese
4 slices bacon, cooked and crumbled
2 Tablespoons chopped red onion

 
Combine the mayo with the sugar and vinegar in a medium bowl and set aside.

In another bowl combine the remaining ingredients and carefully mix. Add the dressing and mix well.

Store covered in the fridge for at least 1 or 2 hours for the flavors to marry a bit.


Tuesday, August 7, 2012

Power Packed Egg Salad Sandwich


I found this recipe way back when I was pregnant with my 2nd child. That was a long time ago. At the time I had already had a very active 3 year old to keep up with and was looking for a quick lunch that was packed with nutrients and still tasted good.. I also had to be easy and inexpensive to make and be quick to eat when I had time to eat. This sandwich fit all of those parameters and more.

Back then I probably ate these r 4 or 5 days a week not only through the pregnancy but for the two years I nursed him too. That was a lot of sandwiches. LOL The great thing is I never got tired of them either. Because of the flavors and the textures this just never got boring.

So if you are looking for a sandwich that really brings a lot to the lunch table you really owe it to yourself to try these.

The recipe makes enough filling for 4 sandwiches and will keep in the fridge for a week. They really don't take all that long to put together either.

I know once you try these you are going to love them as much as I do.


Power Packed Egg Salad Sandwich

½ cup mayonnaise
¼ teaspoon dry mustard
1/8 teaspoon garlic (or onion) salt
3 hard boiled eggs, peeled and chopped
1 cup shredded cheddar cheese
¼ finely chopped celery
¼ cup sunflower kernels
2 Tablespoons sliced green onion
8 slices sandwich bread (or 4 sandwich rolls)
lettuce leaves
tomato slices

In a medium size bowl combine the mayonnaise with the dry mustard and the garlic salt (or onion salt if you prefer) until well combined. Add the eggs, cheese, celery, sunflower kernels, and green onion. Gently combined until well mixed.

Store covered in the refrigerator for up to a week.
To make sandwich use about ½ cup of the filling along with a leaf of lettuce to make your sandwich on your choice of bread. Add a slice or two of tomato at the last moment.

If you are packing this in a lunch I recommend packing the tomato slice(s) in a separate plastic bag to add just before eating.


Monday, August 6, 2012

Breakfast in a Muffin Tin


I remember making this recipe for the first time way back when I was in high school. My dad loved corned beef and eggs and was so pleased with this dish. It became one of his favorite breakfasts while I still lived at home. Because of that I was thinking about my dad a lot when I made this recently.

The ingredients you need for this dish are all things that I normally have on hand all the time so it is easy to pull together.

All of my muffin tins are the 6 cup variety so I use two tins for this making the muffins in one and the eggs and hash in the other. I like this better than one tin anyway because this way I can make sure both the muffins and the eggs are cooked the way I want them. Also I make sure to put the muffin tin that the eggs and hash will be in on a rimmed baking sheet. The eggs almost always run over a bit and this saves my from having to clean the oven.


Breakfast in a Muffin Tin

1 (15 oz) can corned beef hash
6 eggs
salt and pepper to taste
1 (8 ½ oz) box of corn muffin mix (the size that makes 6 muffins)
ingredients called for on the box of mix

Preheat oven to 400 degrees Fahrenheit

Thoroughly grease two 6 cup muffin pans (or one 12 cup muffin pan)

Divide the corned beef hash into six of the muffin cups and press into the bottom and up the sides of the cups. You are forming a shell for your eggs to cook in. It does help if you use the bottom of a drinking glass to help push the hash down to help pack it.

Break an egg into each of the hash cups you just formed and sprinkle the tops with salt and pepper.

Prepare the muffin mix as directed on the box and pour the batter into the rest of the muffin cups.

Bake for 15 to 20 minutes until the muffins are done and the eggs are cooked to desired done-ness.

Friday, August 3, 2012

Pockets of Lemon Cake


I remember the first time I ever made this, my mom had invited some friends over to her house and asked me to come too and bring a dessert. I had just seen this recipe in some magazine and was anxious to try it out. It was such a hit I have made it many, many times since.

The little pockets of lemon filling are such a nice surprise when you cut the cake and really add to the look of the finished cake.

Before you start though I am going to warn you this is going to look really bad coming out of the oven because of way the batter raises up around these little pockets of filling.

The topping is nice and light and does a fantastic job of covering up the top of the cake.


Pockets of Lemon Cake


Cake:
I box white cake mix (about 18 oz)
ingredients called for on box of cake mix

Filling:
1 can (15.75 oz) lemon pie filling

Topping
1 16 oz tub creamy vanilla frosting
1 teaspoon lemon extract
3-4 drops yellow food coloring (if desired)
zest of 1 lemon
1 8 oz tub frozen whipped topping, thawed

Preheat oven to 350 degrees Farenheit
Grease and flour 13”x9” baking dish

Mix the cake mix up according to the directions on the box and spread evenly in the prepared baking dish. Using a spoon drop spoonfuls of the lemon pie filling evenly over the cake batter in the pan, these will become your pockets of lemon.

Bake cake in preheated oven for 30 to 40 minutes or until the edges pull away from the sides of the pan and the top is golden brown.
It should look something like this:


Allow to completely cool to room temperature.


Combine the frosting, extract, food coloring and lemon zest in a medium bowl. Carefully fold in the thawed whipped topping.

Spread evenly over cooled cake.
Store in refrigerator.
Cut into 16 pieces to serve.