Sunday, December 4, 2011

Cranberry Sauce

Like most of my recipes this one is very adaptable to what your family loves and what is on hand when you make it.


I actually buy a bunch of bags of cranberries each winter and throw them in the freezer so we can enjoy this sauce year round. We really love it on sandwiches of all kinds and on the side with all kinds of poultry too. It also can be made into a wonderful barbecue sauce in the summer, I'll try to remember to post that when the time comes.


In the demo I used orange juice and diced apples. The main reason I used those is because that was what I had on hand. This sauce is so good with almost any fruit juice and fruit that you have or is in season. In the summer we love it with fresh mangoes to give it a tropical feel (usually I look for one of the tropical juice blends to use in that version) so use what you love and use my recipe as your road map.


The amaretto is totally optional too, if you don't like it or don't have it leave it out. We really do love the subtle flavor it adds though. 


Find the video here


Basic Cranberry Sauce

In a 3 qt saucepan bring

1 cup sugar
1/2 teaspoon pumpkin pie spice
2/3 cup orange juice
1/3 cup amaretto

to a boil over medium-high heat stirring occasionally to dissolve sugar

when mixture boils add package cranberries (12 oz)
1 apple, diced (about 1 cup)

cook uncovered until skins pop

Reduce heat medium and cook for about 10 minutes or until thickened.

Cover and refrigerate

Sunday, November 27, 2011

Pineapple-Upside Cake

I am back and hopefully you will enjoy the changes I am planning to make on this blog. The most exciting change is that I will be doing videos to go with each (or at least most) of the recipes that I post. I think so many people learn better and are more confident to try something on their own if they can watch someone else do it first. Be sure to look for the link to the video in the post below.


Pineapple-Upside Cake


This one of the favorite desserts in my house and I am sure you and your family will love it too. It is also a very easy cake to make and it is usually the first cake I teach people to make. This is a very forgiving recipe.


I make mine in my 10” cast iron skillet and if you are lucky enough to own one use it but, if you don't have this treasure in your kitchen an 8” or 9” square baking dish will work almost as well.


This is a recipe that is adaptable too, if you don't want to use pineapple you can use almost any canned fruit. I have used canned peaches, apricots, pears  and even Fruit Cocktail all with excellent results. Just be sure to use the fruit packed in juice since you will need that for the cake recipe. I have also used thawed frozen berries as well and it was yummy that way too, in this case just use a mild juice or even milk in the cake batter.


If you are not a fan of Maraschino Cherries you can leave them out entirely or substitute shredded coconut or walnut (or pecan) halves.


Like all my recipes I want you to make this your own, Use what you love and what your family loves to make a dessert everyone will love.


Preheat oven to 350 degrees Fahrenheit

Melt 1/3 cup butter in a 10” skillet  (in the oven)


Meanwhile

Beat

2 eggs until thick and lemon colored (about 5 minutes)


Gradually beat in

2/3 cup sugar


Beat in all at once

6 Tablespoons juice from fruit

1 teaspoon vanilla


Stir together and beat in all at once

1 cup flour

½ teaspoon baking powder

¼ teaspoon salt


Set batter aside


Add ½ cup brown sugar to butter in skillet and stir

Arrange sliced pineapple and cherries in desired patter on the butter sugar combination


Carefully pour cake batter over fruit

Bake at 350 degrees for 45 minutes


Immediately turn onto a serving platter.


Best served warm

Monday, October 17, 2011

I'm Back

I am back, or at least I hope I'm back. My summer has been a series of way too many things going wrong and I have hardly even been in my kitchen. Since I haven't been cooking much it was next to impossible  to post recipes.


I think life may soon be back to normal (or what passes for normal in our house) I am really ready to get back to both cooking and posting. I am so tired of purchased baked goods and quick meals (or worse yet that stuff I have been getting at the drive thru window)

Tuesday, May 10, 2011

Family Favorite Chili


This is my Go-To Chili recipe and what my kids think of when they crave chili. I have been working on it for many years and it is really still a work in progress because I do still change it up a bit from time to time. At this point I have to say it is excellent though.

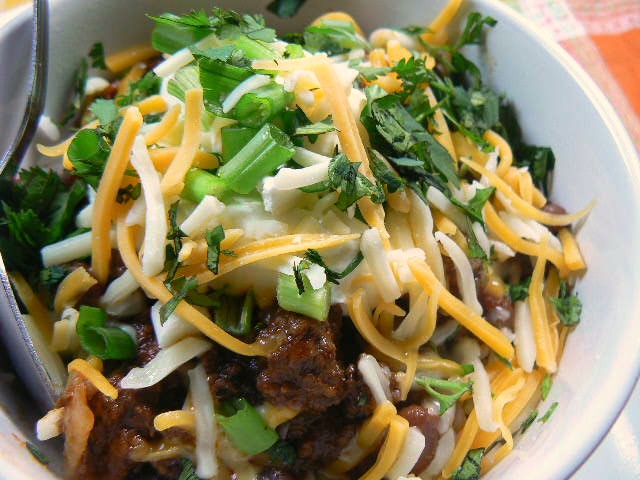
At our house we always serve chili (homemade or out of a can) over rice in a big soup bowl. There is a bit of a story there. Many, many, many (you get the point) years ago, back when I was a young bride we had some very dear friends that dropped by one day. As dinner time neared they were invited to stay to eat (without consulting me as to whether this would be in the cards) and I went into a slight panic mode. You see, I had planned chili for dinner and there really was only enough for 2 not nearly enough for 4. EEK! What to do?? I started going through the meager supplies in my cabinets and found a box of rice. Aha, I thought rice will stretch almost any meal. So I made up a nice big batch of rice, we filled our bowls with the rice first, topped it with the chili and then some toppings to garnish and a new family favorite was born. Now according to all 4 of my kids if there isn’t rice under it, it just isn’t chili!

You will find this to be a fairly mild chili, at least by many standards and yes, I have beans in there. I know, real chili isn’t supposed to have beans but I like them there.

You can top this with your favorite toppings, I have suggested our favorites but anything goes. This recipe multiplies easily and makes for a great inexpensive dish to entertain with. Just increase everything in proportion and taste as you go to adjust.


Family Favorite Chili

1 pound lean ground beef
2 medium onions, chopped
3 cloves of garlic, chopped
1 jalapeƱo pepper, finely chopped
1 Tablespoon chili powder (your favorite brand)
1 teaspoon ground cumin
¼ teaspoon salt
¼ teaspoon pepper
1 Tablespoon unsweetened cocoa powder
1 teaspoon dry oregano
½ cup red wine
1 (14.5 ounce) can diced tomatoes
1 (8 ounce) can tomato sauce
½ cup water
1 (15-16 once) can red kidney beans, drained and rinsed
1 (15-16 ounce) can black beans, drained and rinsed

In a large pan (soup pot or dutch oven) combine the meat, onion, garlic, jalapeno, chili powder, cumin, salt and pepper and cook over medium heat until meat is cooked through and veggies are tender.

Add cocoa powder and dry oregano and stir to combine. Add red wine and stir up any bits from the bottom of the pan. Cook until the liquid is almost all gone.

Add tomatoes, tomato sauce, and water bring to a boil and reduce heat to a simmer. Cover and simmer for at least 2 hours, 3 is better.

Add the canned beans and cook covered for 20 minutes to heat through.

Serve over in bowls over rice and topped with sour cream, shredded cheese, sliced green onions and chopped cilantro.

Friday, May 6, 2011

Black Bean and Cheese Enchiladas

Even though we consume probably more than our share of meat in this house I do like to throw in a vegetarian meal from time to time. Most of the time those vegetarian meals are well received.  However from time to time I come up with a recipe that the kids more than like; they absolutely love. This is one of those recipes. No one ever misses the meat when we serve this either so it is great for everyone. The combination of the black beans, mushrooms and cumin gives this dish a wonderful satisfying flavor.

I use green enchilada sauce in this recipe because that is the version we prefer, if you prefer the red sauce feel free to substitute it.


Black Bean and Cheese Enchiladas


1 Tablespoon vegetable oil
2 medium onions, chopped
1 cup chopped mushrooms
2 teaspoons ground cumin
a generous pinch of salt
1 (15 oz0 can black beans, drained and rinsed
8 (8”) flour tortillas (heated)
2 ½ cups Mexican blend shredded cheese (jack cheese, cheddar and sometimes other cheeses are included)
1 (10 oz) can green enchilada sauce

Heat oven to 350 degrees Fahrenheit
Spray a 13”x9” baking dish with non-stick spray

Heat oil in a medium skillet over medium heat; add the onions, mushrooms, cumin, and a generous pinch of salt. Cook until the veggies are softened, stir in the drained beans and allow to cool a bit.

Use about 3 Tablespoons of the bean mixture and ¼ cup of the cheese to fill each tortilla. Roll the tortillas around the filling and place in baking dish seam side down.

Spoon enchilada sauce over the top of enchiladas in baking dish.
Cover with foil and bake for 30 to 35 minutes or until hot and bubbly.
Sprinkle remaining ½ cheese over top and serve.

Thursday, May 5, 2011

Margarita Steak Sandwiches


If you like a good steak sandwich I think you will love these. You will have to do a bit of planning ahead because first the meat needs about an hour in the freezer to make it easier to cut into thin slices (you don’t want it frozen just firmed up a bit) and then it really needs to sit in the marinade for at least a couple of hours.

I do use tequila in the marinade and you can leave it out if you really want to but I think you will be missing a lot of the flavor if you do. I do cook with alcohol a lot because I like not only the flavor it leaves behind in foods but because it goes a long way on tenderizing meats. You don’t need to break out an expensive bottle of tequila; a moderately priced one will do just fine here.


Margarita Steak Sandwiches

1 lb boneless beef sirloin steak
1 large onion, sliced
¼ cup lime juice (2 or 3 limes)
2 Tablespoons tequila
3 Tablespoons vegetable oil
3 cloves garlic roughly chopped
2 teaspoon chili powder
1 teaspoon cumin
½ teaspoon salt
Oil for cooking
1 green bell pepper, sliced
1 red bell pepper, sliced
4 large hamburger buns, toasted
4 slices Pepper-Jack cheese

Freeze the steak for about an hour and then cut into very thin slices across the grain. Place the steak slices and sliced onion into a gallon size food storage bag. In a small bowl combine the lime juice, tequila, oil, garlic, chili powder, cumin and salt and mix well. Pour the liquid into the bag with the meat and onion and seal the bag. Make sure all the contents of the bag are in contact with the marinade and place into the refrigerator for at least 2 hours (3 or 4 is better) Turn the bag a few times during this process

Heat a large skillet over high heat when it is hot add a bit of oil to cook the meat in and then dump the entire contents of the bag into the pan. Add the green and red peppers too and cook until the meat is cooked and the onions and peppers are crisp tender and most of the liquid has evaporated.

Divide the meat mixture between the bun bottoms top each with a slice of cheese and broil until the cheese melts.


Wednesday, May 4, 2011

Pork Teriyaki Burgers


This is a recipe I came up with to satisfy a craving for teriyaki pork and a burger at the same time. It really does merge the flavor of teriyaki pork into the incredibly handy format of the burger and the flavor coming off the grill adds the perfect compliment to everything.

This is also the perfect companion recipe to yesterday’s Asian Coleslaw because between the two you will use up a small can of crushed pineapple and a most of a can of sliced water chestnuts. And because the flavors compliment each other so well the paring is perfect and a wonderful twist on the typical burger and coleslaw dinner for a warm day.

I have made these burgers both over a grill and in a skillet they work wonderfully either way, you could also broil them if you would prefer. I do use one of those burger-grilling baskets over the gill since they are a bit on the soft side to prevent crumbling.

I think this recipe would be equally good with ground chicken although I haven’t tried it that way yet.

If you are also serving fries with this you might want to double up on the Teriyaki Mayo since it also makes a great dipping sauce for fries.


Pork Teriyaki Burgers
¼ cup crushed pineapple (well drained)
¼ cup diced water chestnuts (canned)
2 Tablespoons Teriyaki sauce
Salt and pepper to taste
1 1/3 to 1 ½ pound ground pork


Teriyaki Mayo
4 Tablespoons mayonnaise
2 Tablespoons Teriyaki sauce
Tabasco sauce to taste

4 Large size hamburger buns
Lettuce

Combine the burger ingredients and mix gently but thoroughly. Form into 4 burger patties, wrap each in plastic wrap and refrigerate for at least 1 hour (up to all day)

Combine the ingredients for the Teriyaki Mayo, cover and refrigerate until serving time.

Heat grill.
Oil burger grilling basket and place burgers in the basket
Cook through
Toast buns on grill


We like these with the Teriyaki Mayo spread on both halves of the buns and lettuce on the sandwich too.

Tuesday, May 3, 2011

Asian Coleslaw


I was in the mood for some coleslaw to go with some burgers I was planning for dinner. The burgers (the burger recipe will be posted here tomorrow) are made of ground pork and are definitely Asian inspired so I wanted a side dish that would take that same path. It used to be that I was not a fan of coleslaw and then a couple of years ago I started to love it, I can’t get enough and make it often changing it up to go with whatever the main dish will be. For this variation I did some checking of what was in the cupboard/fridge and also what I was going to need for the burgers that might have extra. I really think the combo I came up with is really yummy. Be sure to make it a few hours ahead since coleslaw really likes to sit for a while before it is served.

My daughter pointed out during dinner that this coleslaw was extra good because it tastes like coleslaw and still definitely has an Asian flavor at the same time. So many times when you see Asian Coleslaw (or any of the flavored coleslaws) they seem to miss that balance. They either taste like coleslaw or taste like a flavored cabbage salad. I worked really hard to keep the balance here so that both flavors come through.


Asian Coleslaw

Dressing
½ cup mayonnaise
¼ cup sour cream
2 Tablespoons rice vinegar
1 Tablespoon sugar
1 Tablespoon soy sauce
½ teaspoon dark sesame oil

Veggie mix
5 cups packaged coleslaw mix (shredded green and red cabbage and shredded carrot)
½ cup finely chopped celery
¼ cup water chestnuts (I used part of a can of slice water chestnuts and chopped them)
¼ cup sliced green onion
¼ cup crushed pineapple, well drained.

Combine dressing ingredients in a small bowl making sure to combine well.

In a large bowl combine the veggie mix and the dressing. Stir to combine, cover and refrigerate until serving time (at least 1 hour)

Saturday, April 30, 2011

Chicken Caesar Wraps


If you love a good chicken Caesar salad this is the wrap sandwich for you. I have been making this recipe for at least the last decade and it is one of my go-to sandwiches for packing when we have a busy day.

In fact since my daughter is an ice skater and she is competing this weekend; this is what I am packing for us to eat during our busy day. It is super easy because you use one of those pre-packaged salad mixes that has the Caesar dressing, croutons, and romaine lettuce in it, just adding a few ingredients that are normally on hand.


Chicken Caesar Wraps

1 (7 ½ ounce) Caesar salad kit
1 cup chopped cooked chicken
4 flour tortillas (8" to 9" size)
2 Tablespoons freshly shredded Parmesan cheese

Begin by crushing the croutons that come in the kit and setting them to the side. In a large bowl combine the remaining contents of the salad kit and the chicken.

Divide the chicken/salad mixture between your tortillas sprinkle with the crushed croutons and the Parmesan cheese.

Roll up and wrap in wax paper or foil. Keep cold until lunch time
Makes 4 tasty wrap sandwiches

Friday, April 29, 2011

Chocolate Peanut Butter Cup-cakes

What is it about that delightful combination of chocolate and peanut butter? I know it gets me every time I see it; I just have to have it. This cupcake and frosting combination is one I have been making here for a long time and it is always a real favorite.


Chocolate Cupcakes

1 ½ cups all purpose flour
1 1/3 cups sugar
1 ¼ teaspoons baking soda
¼ teaspoon baking powder
¾ teaspoon salt
½ cocoa powder
½ cup all vegetable shortening
¾ cup water (or for an extra special flavor use cold left over coffee)
½ teaspoon vanilla
2 eggs

Preheat oven to 400 degrees Fahrenheit.
Prepare muffin pan with paper cupcake liners (20-24)
Combine the dry ingredients in a mixing bowl and add the shortening. With a mixer beat to combine well. Add water and vanilla and beat on medium speed for 2 minutes. Add eggs and beat another 2 minutes.
Transfer batter to prepared pan
Bake approximately 15 to 20 minutes (test with a toothpick)

Peanut Butter Frosting

2 cups powdered sugar
1 cup creamy peanut butter
½ cup all vegetable shortening
3 Tablespoons milk

Combine powdered sugar, peanut butter and shortening in mixing bowl and beat to combine. Gradually add milk to make frosting consistency you want, beating for at least 3 minutes to get a nice fluffy frosting.
I prefer to use a disposable decorating bag (or a ziplock storage bag with the corner cut off) to apply this frosting to the cupcakes.

Sprinkle with chocolate sprinkles if desired.

Thursday, April 28, 2011

Deviled Eggs


I always seem to crave deviled eggs the week after Easter; probably a leftover from when the kids were little and I had a bunch of colored eggs to deal with. This week I made a basic deviled egg to share with you, nothing fancy although it is certainly easy to change up. I used capers because I always have them in the fridge but if you don’t have any or just don’t like them feel free to substitute chopped pickles, chopped olives, chopped green onions or chopped green chilies; just be sure to chop them small (about the size of those capers) so they mix well in the yolk mixture.


Deviled Eggs

6 hard cooked eggs
¼ cup mayonnaise
3 Tablespoons capers
1 ½ teaspoons prepared mustard
Dry dill weed, salt and pepper to taste
Dill and paprika for garnish (optional)

Peel and cut your hard cooked eggs in half lengthwise. In a small mixing bowl mash the yolks with a fork then add mayonnaise, capers, mustard, dill, salt and pepper and combine into a smooth mixture. Using a spoon or pastry bag fill the egg white halves with the yolk mixture. Cover and refrigerate until serving time.
Sprinkle with additional dry dill and paprika just before serving.

Monday, April 25, 2011

Hamburger and Pasta Skillet

I know I sound like a broken record talking about having foods in the freezer ready to make meals with but I am firm believer in doing this so I am going to talk about it. Today I am sharing a recipe for both a Hamburger and pasta dish that is really so much better than the ones you get in the box (you know what I’m talking about) and really just a quick to get on the table. This recipe relies on a base mix that I try to keep in the freezer all the time. I make this base up every few months in large batches and freeze it to make lots of different types of dishes. This process can be called “freezer cooking”  or “investment cooking” or any of several other terms. They all mean basically the same thing, you cook and freeze to use later. I have been doing this off and on for probably 20 or more years and I have notebooks (literally) filled with my favorite recipes. Today’s “Basic Meat Combo” is really versatile and I will share more recipes to use it in in the near future. It will keep in the freezer for about 3 months and will make 5 dinners each serving at least 4 people.


If you have your pasta and veggies already pre-cooked and in the fridge ready to go you can actually have the Hamburger and Pasta Skillet on the table in about 20 minutes (I timed it while I cooked this time)


Basic Meat Combo

¼ cup vegetable oil or shortening
4 sliced onions
4 garlic cloves, minced (or grated)
2 cups chopped celery
1 cup chopped carrot
5 pound lean ground beef
5 teaspoons salt
½ teaspoon ground pepper
3 Tablespoons Worcestershire sauce
4 cups ketchup
Hot sauce to taste

In a large skillet over medium heat cook the onions, garlic, celery and carrots until tender. Add the ground beef; stir and cook breaking the meat up until the meat is cooked through. Drain off most of the excess fat, Add the remaining ingredients and combine thoroughly. Taste and adjust seasonings. Cover and simmer for about 20 to 30 minutes to allow the flavors to combine.

Cool and evenly divide between 5 pint size containers (pint= 2 cups) use a spoon to stir the mixture in the containers a bit to get rid of any air pockets. Label and freeze for up 3 months.


Hamburger and Pasta Skillet

1 pint container of Basic Meat Combo (recipe above) thawed
3 cups of cooked pasta (any pasta will do, I used whole wheat today)
2 cups cooked vegetables (leftover or frozen ones you have thawed)
1 8 ounce can tomato sauce
1 Tablespoon Italian herb seasoning
½ cup shredded cheese (your favorite)

In a large skillet  over medium heat combine all ingredients except the cheese, cover and cook  until heated through about 10 to 15 minutes, stirring occasionally. Be sure to taste and adjust the seasoning at this point. Sprinkle cheese over top (don’t stir in) cover and allow cheese to melt.

Serves 4 or 5

Ham and Walnut Pasta


I have one more recipe here to help you use up some of that leftover Ham from the weekend. This one came about because I was in the mood to try something new so I began searching through my cookbooks. I came upon a recipe that looked interesting but I had less than 1/3 of the original ingredients on hand. However, the concept (browning some breadcrumbs to add to the pasta) intrigued me. I read through the recipe then headed into my kitchen. I then made choices from what was available in the cabinets, fridge and pantry and this is what I came up with. It really in no way resembles the recipe I saw in the book but we loved it. In fact my daughter and I fought over who got the leftovers for lunch the next day. (We reached a compromise and split it)


Ham and Walnut Pasta

1 pound spaghetti
¼ cup chopped walnuts
2 Tablespoons olive oil
2 Tablespoons plain dry breadcrumbs
½ pound cooked ham, cubed
¼ teaspoon crushed red pepper
2 cloves garlic, chopped
10 ounce bag fresh spinach
½ cup cooking water from the pasta
Salt and pepper to taste
1 Tablespoon lemon juice
Parmesan cheese (optional)

Start by getting your water to cook your pasta in boiling, you will want to be cooking you pasta while you are making the rest so go ahead and add the pasta when the water boils. Drain pasta when it is cooked. Be sure to reserve ½ cup of the pasta water.

Meanwhile, in a sautƩ pan toast the walnuts until they just begin to turn a bit brown and you begin to smell them. Add the olive oil and breadcrumbs and cook until the mixture browns. Remove this from the nut mixture to a bowl to save for later and wipe the pan out.

In the same pan combine the ham, crushed red pepper, and garlic and cook to brown the meat and toast the garlic a bit. Add the spinach and ½ cup of water that the pasta is cooking in (this will not only cook the spinach but there is starch from the pasta will help the sauce to form) and cover to cook the spinach.

Toss the pasta, the spinach mixture, the nut mixture and lemon juice to combine. Top with some parmesan cheese if desired.

Sunday, April 24, 2011

In the Name of Simplicity

I am very lucky to have a couple of wonderful produce stores that I can visit on a regular basis. Today I made one of my favorite stops at E.Z. Orchards just north of Salem Oregon. I try to stop there anytime I am anywhere near it. They not only have some of the best fresh produce I have ever seen they also have a wonderful little gourmet food department and some doughnuts that are to die for (be sure to look for the bowls of doughnut samples as you come in the door) Always a fun stop.

Since I knew today was going to be busy I went in search of veggies to toss on the grill for dinner. When I am on this type of quest I don't go in with a list I simply let the produce talk to me. As I made my trip through the display of wonderful fresh produce I simply chose those that looked the best and that I knew would grill beautifully. The choices I made today were: asparagus, zucchini, green peppers, some baby crimini mushrooms, and a beautiful basket of mixed cherry tomatoes.

When produce is this fresh and wonderful I like to let it stand on its own. I felt tonight a simple treatment was what was in order so I simply cut the zucchini, asparagus and bell pepper into bite size pieces and combined them with the rest of the choices and added a simple pour of good olive oil and some salt and fresh ground pepper. Since dinner really doesn't seem like a meal with just the veggies I also gave a simple boneless, skinless chicken breast (that I had butter flied) the same simple treatment. At the last minute I grabbed a can of sliced pineapple from the shelf and drained the slices well and added them to the rest of the my gathered supplies. As soon as the grill was hot (be sure you have a mesh grill surface so you don't loose any veggies to the grill) I put the chicken breasts on to start cooking. After a mere 5 minutes I turned the chicken and added the veggies and the pineapple. Two and a half minutes later I turned the veggies and pineapple and gave everything another two and half minutes. At the end of the cooking time I had a marvelous treat that highlighted the fantastic fresh veggies.


So take a trip through a produce store or find a local farmer's market and find the treasures of the day. Especially when the produce is fresh a simple treatment and a turn on the grill is the perfect end to a wonderful spring or summer day.

Q & A with Mummsie April 24, 2011

Emma asks: Mummsie, I notice that when you use brown sugar you seem to always call for dark brown, is there a reason and can I use light brown instead?

Emma, you are right in the recipes I write I usually use dark brown sugar and it is simply because at our house that is what we like the best. Feel free to use the light version in my recipes if that is your preference. All brown sugar really is, is granulated sugar with molasses added to it. The dark brown has more molasses so the molasses flavor is more pronounced and we happen to really like that so that is what I tend to balance the recipes for.


Melanie asks: When a recipe calls for butter should I use salted or unsalted?

Well, that depends partly on who wrote the recipe. When I write a recipe I unless I specify unsalted I am using the regular salted (sometimes called “sweet butter”) because that is generally what I have in the fridge. Unsalted butter has a much shorter lifespan so if I do buy it unless I am using it immediately I store it in the freezer.


Elizabeth asks: When I make cookies I can never get them all the same size, what is your secret to getting them all the same size?

That is a really good question, and it really isn’t a secret. I use a cookie scoop; it looks like an ice cream scoop except it is smaller. I use mine for all kinds of things besides cookies too. I use it to portion out meatballs and to fill the holes in my mini muffin pan. I think I paid $5 or less for mine and I love it.

Saturday, April 23, 2011

Ham and Cheese Pancake Roll-Ups


I know that many of us will be eating a ham on Easter so I decided to dust off one of my favorite recipes to use some of the leftover ham. First let me say that I love ham just about any way you fix it, but this is a real hit with the entire family. The amounts are flexible so you can tailor it to what your family likes and the amount you have left over.

This time I was in a hurry when I made this and to be honest I used pancake mix to make the pancakes and that is the way I am presenting the recipe. If you would rather to make your pancakes from scratch or any other favorite method feel free to do them that way. Just add the onion and an extra pinch of salt to your batter before you cook them.


Ham and Cheese Pancake Roll-Ups

3 cups of cooked ham, diced
½ cup vegetable oil
½ cup all purpose flour
Salt and pepper to taste
3 cups milk
2 Tablespoons mustard (spicy brown or Dijon)
4 dashes of Tabasco sauce
2 cups shredded cheddar cheese
2 cups of pancake mix (the kind you just add water to)
1 1/3 cups water
1 medium onion, finely diced

Begin by combining the ham and oil in a medium saucepan and cook over medium heat until the ham begins to brown. Add the flour, salt and pepper and stir over until bubbly. Add milk gradually stirring to combine. Heat to boiling stirring often, boil for about 1 minute then add the mustard and Tabasco sauce. Stir in cheese until mostly melted then turn off heat leaving pan on burner to stay warm. Continue to stir making sure cheese is melted completely before serving.

Meanwhile combine the pancake mix, water and onion mixing to combine. You want to have a slightly thin batter. Cook in a hot skillet using about ½ cup of batter for each pancake (I use a ladle to portion out the batter)

As pancakes cook move to a plate in a warm oven to keep warm until serving time.

To serve spoon ham and cheese sauce mixture onto pancake and roll up.


Friday, April 22, 2011

Lemon Butter Catfish

There are some things that I always try to have on hand; frozen fish (of all kinds) is one of those items. One of the things I love about it is that it is really a blank canvass. I can do so much and make it fit into any mood. I sometimes refer to it as the “little black dress of the freezer” simply because it can be dressed up or down to fit any occasion. This fish dish is so easy and although I used catfish you can use your favorite fish fillets either fresh or frozen.


Lemon Butter Catfish

¼ cup all purpose flour
2 Tablespoons cornstarch
2 Tablespoons grated parmesan cheese (the kind in the can is fine here)
Salt and pepper to taste
4 catfish fillets (thawed if frozen)
1 Tablespoon olive oil (or as needed)
3 Tablespoons butter (divided)
The juice of 1 lemon

Preheat your skillet over medium high heat.
Add oil and 1 Tablespoon butter to pan.
Combine flour, cornstarch, parmesan, salt and pepper in a flat dish (pie plate works great here) and use to dredge fish. Add fish to hot pan immediately.
Allow fish cook on first side long enough that the fish no longer sticks. If you start in a hot pan, add the fish and leave it alone it will let go when it is ready to turn. Carefully turn fish and cook on second side.
Remove fish to serving plate and add the remaining 2 Tablespoons of butter and the lemon juice to the pan. Allow butter to melt and use a spoon to scrape the bottom of the pan. Pour the butter/lemon mixture over fish and serve immediately.

Thursday, April 21, 2011

Mexican Wedding Cake Cookies

Mexican Wedding Cake Cookies

I have heard these little cookies referred to by many names, usually Mexican Wedding Cake Cookies or Russian Tea Cookies. I think probably by other names that I can’t think of off the top of my head, I have no idea what the history of them and I don’t really care where they came from. All that is important is that they are so tasty. There are very few cookies that are simpler either in ingredients or preparation but few are at the same moment so good either.

Growing up I am pretty sure these were at every event that the moms had to bring cookies to, but different moms brought them to each event. They all tasted about the same even when they had a different name. I doubt there were ever any to carry home because I think they were always the first to disappear from the table.


Mexican Wedding Cake Cookies

1 cup butter
2 cups all purpose flour
½ cup powdered sugar
2 cups chopped walnuts
½ teaspoon vanilla
extra powdered sugar for rolling completed cookies in

Preheat oven to 350 degrees Fahrenheit
Combine all the ingredients (except the extra powdered sugar) in a mixing bowl until well combined.
Roll dough into small balls (about 1" in diameter)
Bake for 10 to 12 minutes
Cool on rack
When completely cooled, roll in the extra powdered sugar
Enjoy!

Makes about 3 dozen cookies

Wednesday, April 20, 2011

Greek Chicken Pizza


This pizza came about simply because I needed to figure out dinner and I really didn’t feel like driving to the store. I was in the mood for a pizza and I happened to have some things on hand that led me down a path to a Greek inspired pizza.

You could use your favorite pizza crust, I am including the one I used (it is the one I use most often) but feel free to substitute your favorite. At our house we like a chewy crust on our pizza and to accomplish this I par-bake my crust before I top it. This particular crust is made using my bread machine, so if you have one this is a good place to use it.

You will find that I didn’t use a canned pizza sauce; instead I used an 8 ounce can of tomato sauce which I seasoned up with some herbs and spices from my spice cabinet. I do this on most of our pizzas since I almost always have tomato sauce on hand.


Pizza Crust from the Bread machine

½ cup milk
3 Tablespoons olive oil
1 1/3 cups all purpose flour
1 teaspoon Italian seasoning
¼ teaspoon garlic salt
¼ teaspoon fennel seed
1 teaspoon yeast

Layer the ingredients in you bread machine in the order directed by your owner’s manual. If your machine has a Pizza Dough cycle choose it, otherwise choose the regular dough setting.
At the end of the cycle remove dough to a floured surface, cover and let rest 20 minutes.
Preheat oven to 450 degrees Fahrenheit
With oiled fingers pat dough onto an oiled pizza pan. Use a fork to poke holes in the dough to prevent it from over-rising while baking.
Bake the dough for about 10 minutes or until browned. You can use it immediately to make a pizza or set it aside until you are ready for it.


Greek Pizza

Baked pizza crust (you favorite or the one above)
8 ounce can tomato sauce
1 teaspoon Italian seasoning
¼ teaspoon fennel seed
1 ½ cups shredded mozzarella cheese
2 cups cubed cooked chicken
½ cup thinly sliced red onion
½ seeded chopped tomato
½ cup crumbled Feta cheese
¼ chopped Kalamata olives
1 teaspoon dry oregano

Have oven heated to 450 degrees Fahrenheit
Mix the tomato sauce with the Italian seasoning and fennel seed and spread over baked crust. Top with remaining ingredients in order given.
Bake directly on oven rack for 10 minutes or until hot through and cheese is melted.


Tuesday, April 19, 2011

Turkey Taco Filling

This is one of those recipes that really doesn’t have an official name but it appears on our table regularly. The kids all love it and it is one of the recipes that my oldest son has been known to call me from the grocery store just to check that he hasn’t forgotten some ingredient because it just seems too simple to be correct. Yes, there really are only 2 things to put in the slow cooker and it can sit in there for up 12 hours (maybe even longer) and be wonderful. It is great as leftovers the next day and I have yet to find anyone that doesn’t like it. Even people that tell me they don’t really care for turkey can’t get enough of it.

The way we usually serve it is wrapped in a tortilla with cheese, sour cream, tomato lettuce, really what ever we have on hand that would normally go into a burrito or taco. I also love to use the leftovers to make a nacho the next day. My oldest son tells me it is fantastic mixed in Spanish rice too.


Turkey Taco Filling

2 turkey thighs (they usually come 2 to a package at my store)
1 package Taco seasoning (any style, any brand)

Place the turkey thighs in your slow cooker and sprinkle the contents of the package of taco seasoning over them. Use the entire package even though it looks like a lot it is just right.

Cover and cook on low for at least 8 hours, up to 12.

Remove skin and bones and shred meat. Use to fill tacos, burritos, in a nacho, and probably many more places that you can come up with.

Store leftovers in the juices that form in slow cooker in a container in the fridge. I find if I store it without the liquid it tends to dry out when I reheat it.

Monday, April 18, 2011

Mini Cupcakes with Lemon Frosting for Easter (or any time)


I love cupcakes; there is just something so wonderful about being able to have a little cake all to yourself. I have been wanting to go even smaller by using my mini muffin pan to make some really tiny ones and a while back on a stroll through my local dollar store I came across some adorable little tiny mini cupcake papers in Easter designs. I had to buy them, they were just too cute to leave in the store. So this weekend I put them to good use and made my go-to cake recipe into mini cupcakes and paired it with my very favorite Lemon Frosting. Way back in the dark ages I used to eat a lot of those hard lemon candies, the ones that are sour lemon on the inside and coated in sweet sugar, do you know the ones? This frosting reminds me of that childhood favorite, it is sweet and tart all in the same bit.


Mini Cupcakes

1 ½ cups all purpose flour
1 cup sugar
2 teaspoons baking powder
½ teaspoon salt
1/2 cup vegetable oil
2/3 cup milk
1 teaspoon vanilla
2 eggs

Preheat your oven to 400 degrees Fahrenheit
Line the cups in you mini muffin pan with mini cupcake liners

Begin by combining all the dry ingredients in a medium bowl.
Add the oil and milk and beat with a mixer for 2 minutes.
Add the eggs and continue to beat at with a mixer for 2 additional minutes.
Fill the mini cupcake liners in the mini muffin pan with the batter (mine took about 2 Tablespoons per cup)
Bake at 400 for 10 to 15 minutes, test with a toothpick for doneness.
Allow to cool in pan 10 minutes then remove to a rack to finish cooling

Lemon Frosting

2 cups powdered (confectioners) sugar
¼ all vegetable shortening
2 – 3 tablespoons fresh lemon juice

Combine the sugar and shortening until blended through.

Add the lemon juice beating until it reaches a spreading consistency.

Makes about 4 dozen mini cupcakes

Sunday, April 17, 2011

Q & A with Mummsie April 17, 2011

Phil asks: Hi - I've been reading your blog at the suggestion of Grant Cunningham, and I'm hoping you might have some advice for me:

I've been trying to develop a recipe for bacon cheddar jalapeno(or chipotle) cornbread, and my efforts so far have been edible, but not outstanding. Can you offer any suggestions? I would add that my goal here is to develop a cornbread that is simultaneously moist, savory, sweet and spicy, with definite salty-smoky bacon flavor and, ideally, some textural crunch from the bits of bacon. Also, I prefer to bake it as muffins in a 12-cup tin, for convenience in serving.

I have done a batch with a half-pound of cooked chopped bacon, with the bacon grease added to the batter - it was a decent-tasting batch, but again not outstanding. Do you think I could take a shortcut by adding the chopped bacon to the batter uncooked, and letting the oven cook the bacon and render the fat into the cornbread during the baking process?

Thanks in advance for your attention.


 Phil, thanks so much for following Grant’s advice and stopping by I hope I can give you the help you need here to make this amazing sounding cornbread you have in mind.

I think the best way to tackle your question is to tell you how I would go about figuring out the recipe if it was me.

The first step is to find a basic cornbread recipe that you love, to use as the foundation of this experiment. You want to find one that fulfills your expectations in regard to base taste, texture and sweetness/savory areas. I would suggest unless you want a very sweet cornbread that you with a Southern style recipe that contains buttermilk and baking soda, those seem to play better with spicy and salty flavors in my opinion. Next get that recipe just the way you like it. One thing I do many times is to switch out the buttermilk with orange juice this sweetens it up a bit and gives a nice background flavor.

The next step in this process is to switch out the fat that is called for with your rendered bacon fat, using the amount that was called for in the recipe. The balance of flour, liquid, fat and leaveners is a delicate balance that is important in the end result. If you add too much fat you will upset this balance and probably end up with a very heavy finished product.  I would not add the bacon raw because part of what gives bacon that wonderful flavor we all love is the frying process. If you just put the bacon in raw it will at best just steam in the bread, leaving you a limp blob. At this point you might also add in some ground cumin, its flavor will accent the bacon’s smokiness and help to bring it out.

Don’t forget to stir that cooked bacon into the batter too. You might also want to save a few pieces to scatter over the top of the batter once it is in the pan (before baking) especially if you are making muffins so you know there are bacon bits in every bite.

Next you can feel free add your other ingredients, the cheese and peppers. I think I would go with the chipotles myself because of the wonderful smokiness they offer to the party. 

I hope this helps you some in your quest, let me know how it turns out and feel free to ask more questions.

Now after talking about cornbread, I am craving some myself so stay tuned for a cornbread recipe in the near future.

Saturday, April 16, 2011

Hot Fudge Pudding Cake

This is the number one, absolute favorite dessert at our house. I can almost guarantee that if I was to ask any of my kids (there are 4 of them) what dessert they would like me to make them this will be the answer. I am good with that because what they don’t know is that this is also probably the easiest dessert I make too. Not only is it tasty, warm, gooey, comfort food; there is something magical about the way it makes its own layer of pudding underneath the layer of chocolate cake. I mostly make this during the colder months and since spring is promised I figured I should share this while we are still having some chilly days.

This mixes together so easily and contains ingredients I always have on hand so it is the perfect emergency recipe for those times when you need something at the last minute. I can usually get it mixed together and into the pan in the time it takes for the oven to heat up. Then it bakes and can be served almost immediately (let it sit about 10 minutes)  after it comes out to the oven but, it is also very tasty at room temperature too.


Please note that while this is the easiest recipe I know of for dessert it is also the hardest to get a decent picture of.

Hot Fudge Pudding Cake

1 cup all purpose flour
¾ cup sugar
2 Tablespoons unsweetened baking cocoa
2 teaspoons baking powder
¼ teaspoon salt
½ cup milk
2 Tablespoons vegetable oil
1 teaspoon vanilla
1 cup brown sugar
¼ cup unsweetened baking cocoa
1 ¾ cups very hot water

Heat oven to 350 degrees Fahrenheit
Mix flour, sugar, 2 Tablespoons cocoa, baking powder and the salt in a mixing bowl to combine. In a measuring cup or small bowl combine the milk, oil and vanilla until well combined. Add the milk mixture to the dry ingredients and stir just until combined. You will have a rather thick batter. Spread this batter evenly in an 8”x8” baking dish (ungreased)

Sprinkle brown sugar and ¼ cup of cocoa over the top of the batter in the baking dish. Try to get it as even as possible. Pour the hot water evenly over the top and bake immediately.

Bake for 40 minutes or until the top is dry. Cool for about 10 minutes and serve in bowls with the sauce from the bottom of the pan spooned over the cake layer.

Friday, April 15, 2011

Bread Machine Focus week Day 5-Beyond the Basics or the Bells and Whistles


Today I thought I would tell you a bit about some of the extra features that some bread machines come with.

I can speak mostly for the one I have so let’s start there.

One of the features mine has that I do use from time to time is the whole wheat setting. On this setting everything is pretty much the same as the basic or white setting except the machine goes through a “warming” cycle before it mixes the ingredients. Since my kitchen tends to be very cold in the winter this setting comes in handy then. I could certainly live with out it.

Most machines give you the choice of crust color so the bread can be tailored to your liking.

In addition to the standard dough cycle my machine has a pizza dough setting which has a shorter rise time since pizza dough doesn’t need to rise as long as rolls.

One of the cycles that has intrigued me since I got my first bread machine is the Jam Cycle, I make a lot of jam in the summer and fall but I had never tried to do any in the bread machine. I decided to give it go this week (all in the name of research for this column). Since I didn’t really have any fresh produce around that would work very well for jam I chose to use frozen strawberries. The recipe and picture of the finished product are below. It was certainly the easiest jam I have ever made, simply put the ingredients in the bread machine and walk away for just over an hour, and then allow to chill in the fridge for another 3 or so hours. I have to admit it does lack something in texture but it is certainly good. I will be repeating the recipe in the future. My official “Jam Tester” (my youngest son, age 12) says he likes this better than a lot of jam because it is not too sweet, just right in his opinion.

My machine can also bake a cake, another cycle I have never tried so I can’t really speak for it.

There are also several different cycles for baking special types of breads from French style to fruit and nut breads. Other machines have settings for Artisan breads and quick breads.

Both of the machines I had used have also had rapid or ultra-fast cycles, these usually take more yeast and result in a baked loaf much faster than the normal cycle. I have used them and when I am in a hurry they are a lifesaver but the quality of the loaf in my opinion is not as good and the traditional cycles. That being said I have noticed several recipes out there for Gluten Free Bread machine breads and they are all baked in the rapid cycles. I am already planning to experiment with some gluten free breads in the near future so watch this column for some of those recipes and thoughts.

Sometimes you might want to add additional ingredients into your bread later in the kneading process. Maybe dry fruit or nuts or chocolate chips things that you don’t want to add at the beginning because they will get too broken up in the mixing process. Some machines have a beeper that will alert you to add ingredients later but you do have to be where you can hear the beep. My current machine actually has a little bin that you put your add in ingredients into and then when you set up the cycle you tell it to add them at the correct time

In my online research I looked at numerous bread machines to see what is on the newer models. I looked at machines with a low price of around $60 up to just over $200 in price range. I found that many of the machines share a lot of cycles in common. Some of the higher priced machines had longer delay settings some up to at least 24 hours. Some had the ability to make larger loaves of bread. One in particular (I don’t remember what brand but it was around $200) could make not only 1 2 pound loaf you also had the option to make 2 1 pound loaves at the same time. It also had mixing paddles that fold down before the baking cycle starts so there is no hole from the paddle in bottom of the loaf.


I also found a few machines that had a yeast dispenser so your yeast is added to the mixture at the perfect moment.

I know this is probably just the tip of the iceberg when it comes to features on bread machines and as manufacturers come up with newer models there will be even more. So do some research I am sure there is a bread machine that is perfect for your home.


Strawberry Jam in the Bread Machine

1 16 ounce bag of frozen strawberries (unsweetened) thawed and mashed
1 ½ cups sugar
1 Tablespoon fresh lemon juice
1 package (1.75 ounces) powdered fruit pectin

Add all the ingredients into the pan of your bread machine in the order given above. Put the pan into the bread machine and choose the “jam” cycle. At the end of the cycle remove the jam from the bread machine and pour into a heat proof container and chill for about 3 hours to set up.This is definitely not a super sweet jam, we found it slightly tart but very good.