Showing posts with label main dish. Show all posts

Wednesday, September 24, 2014

Breakfast Meets Lunch-for Dinner the Monte Cristo Sandwich

Let me first say this is our variation of the Monte Cristo Sandwich and it may differ from the tradition a bit. I am really not sure how close it comes even.


The roots of our house eating this dates back a while. One day I was watching some cooking show or another on TV and the host was making his/her version of the Monte Cristo. It just happened that my daughter walked through the room at that time and mentioned it looked really good.

A couple of weeks later she and I happened to be at the grocery store (on our way home from the ice rink) and I asked her what we should have for dinner the next day. We talked about a couple of possibilities and this sandwich came up. Neither of us could remember exactly how it was made or the exact ingredients but we got ingredients for what we remembered. I put this sandwich together the next night and it was a huge hit. It has regularly been on the table ever since. And you know what I never did go back to see how close this comes to the one we saw on TV that time. LOL

So you may be asking why the title of today's post. Well when you get right down to it that is what this sandwich is: part breakfast part lunch and we usually have it for dinner. The breakfast part is the exterior of the sandwich which is our old friend French Toast. The inside of the sandwich has a nice meat and cheese filling. This is all combined into a wonderfully yummy sandwich that can proudly become your dinner.

The coating for the outside is based on my standard French toast recipe. You will need this much for every one and a half sandwiches. In other words this much will do 1, double this amount will coat 2 or 3 and so on.

So for every 1 and half sandwiches:
1 egg
¼ cup milk
2 Tablespoons Bisquick
a pinch of salt.

For each sandwich you will need:
2 slices white bread- we like either potato bread of a good sourdough
deli sliced ham
deli sliced turkey
deli sliced Swiss cheese
mayonnaise
berry jam

Start pre-heating your skillet while you build the sandwiches, I almost always use my big old antique cast iron skillet for this. I also pre-heat my oven to just warm and prepare a flat baking sheet with a wire rack. This way I can cook one sandwich at a time and move them to the oven to stay warm.

I like to line my slices of bread up in pairs for the sandwiches and do this assembly line fashion. First spread a tiny bit of mayonnaise on each slice of bread. This will help to seal it and prevent the outside coating from making it soggy later (don't ask how I know this)
Next layer on Swiss cheese on all slices of bread right over the mayonnaise. Now on half the slices add the turkey and on the other half add the ham. Over the ham spread a bit of the jam, probably about a ½ Tablespoon or so- it's up to you. Now plop those sandwiches together. From the bottom up you should have:
bread
mayonnaise
Swiss cheese
Turkey
Jam
ham
Swiss cheese
Mayonnaise
bread

Now combine those coating ingredients in a shallow dish (I usually use a pie plate) getting the mixture as smooth and lump free as possible.

Add just a tiny amount of butter to your pre-heated skillet.

Carefully dip the first sandwich into the coating turn and coat both sides just like you were making french toast. Now move the sandwich to the skillet and cook until the bottom side is nicely browned. Carefully flip the sandwich over and cook the other side.

Since I always only cook one sandwich at a time- it is much easier this way I now move the cooked sandwich to a wire rack on a baking sheet and stick this into a warm oven. This does two things it allows the sandwich to stay warm while I fix the rest of the sandwiches and also it helps to make sure the cheese is all the way melted without risking burning the outside of the sandwich.

That is really all there is to it. These are sooooo yummy your family will love them, I know mine does.


Wednesday, April 17, 2013

Cajun Stew


I was really at a loss for what to call this dish, I know what it is not (a jambalaya) but stew comes the closest to what it really is. I came up with this one all because of some sausage I tasted at a demo table at a grocery store several months ago. I needed to just pick up a couple of things and the parking lot at the store I normally go to was a zoo so I went to the store down the street that I don't go to very often. As I was walking through there was a very nice lady offering up samples of a smoked sausage from a company that I was not familiar with. I tried all the varieties and decided to take a package of the cajun spiced one home with me. Now I needed to figure out how to serve. I thought about it a couple of days and decided I wanted to play around with it a bit.

Since I live a ways from the nearest grocery store I always have stuff on hand in the freezer and pantry. When you live out here you don't run to the store at the last minute to pick up something for dinner. There is also no delivery any where near here. I started to think about what I had on hand. I knew there was some chicken breasts in the freezer (these are always in my freezer) and I had picked up some frozen shrimp a few days before. Hummmm.....

I mulled the choices over for a few days and decided to combine the sausages with both of the above meats. I knew I wanted to go cajun style so that meant onion, celery and green pepper. I had all of these on hand so now dinner was coming together. I wanted the chicken and shrimp to stand up to the sausage so I decided to coat these two items with some of my homemade cajun seasoning blend (I'll add that recipe at the end of this post). I knew it wouldn't take much of the seasoning, a little goes along way but it is so good on almost all meats. I had just picked up a bunch of cans of diced tomatoes and I like a tomato base to this kind of dish so that went on my mental list of ingredients. My fresh thyme was doing well at that time too and since there's dry thyme in my seasoning blend I thought that would be a good addition too (I like to add some fresh herbs in wherever I can)

The rest of the ingredients came about as I tasted the dish as I made it the first time.

Now all that being said the day I recorded this I couldn't get the cajun sausage and used some smoked sausage that was labeled Spicy Italian. It worked just as well. If you want to cut back on the spiciness of the dish use a smoked Polish type sausage. Really any variety of pre-cooked (smoked) sausage will work just fine.

We really love this one and it is really easy to make in a larger batch to feed a crowd. Since the different elements are cooked separately and come together at the end just increase it to fill up your crew. The recipe as written is plenty to fill up my son and myself and have plenty of leftovers for lunch.

On the subject of servings and more importantly how many servings my recipes make. That is a really tough question since I am trying to fill up a growing teenage boy. I swear at this age (14) they can eat enough for an army and still pop up for a snack 5 minutes later. He is currently 6' tall and still growing. So how many normal people will this feed?? You will have to be the judge of that one.


Cajun Stew

½ lb large shrimp (peeled, deveined and thawed if frozen)
1 boneless, skinless chicken breast cut into bite size pieces
1 Tablespoon Cajun Seasoning blend
½ lb spicy sausage Cajun style or spicy Italian smoked sausage
2 Tablespoons vegetable oil
1 large onion, sliced
1 green pepper sliced
3 ribs celery sliced
1 teaspoon fresh thyme
1 (16 oz) can diced tomatoes
a splash of white wine (optional)
3 Tablespoons of a grainy mustard
1 Tablespoon red wine vinegar


Cajun Seasoning Blend

2 teaspoons salt
2 teaspoons garlic powder
1 Tablespoon paprika
1 teaspoon fresh ground pepper
1 ½ teaspoons dried oregano
1 ½ teaspoons dried thyme
1 teaspoon instant minced onion
1 teaspoon cayenne pepper
½ teaspoon read pepper flakes

combine and store in a jar in a dark place. 


Wednesday, March 20, 2013

Corn Dog Casserole


This is a dish I have been making for at least a decade. It is a particular favorite of my middle son. I think the reason the kids love it is because it combines the flavors of several summer time foods all in one comfort dish of a casserole.

The thing I love most about it is that all of the ingredients are things that are easy to have on hand so it is great to serve when you have people show up just in time to expect to be fed.

You can vary the flavor somewhat by your choice of the bottled BBQ sauce and the baked beans, these come in lots of different flavors and the nice thing is they come on sale at great prices often too. Since they are both canned goods they store in the pantry really well. The little sausages tend to come on sale from time to time too and I try to stock up when they do. They freeze really well and I have been known to partially thaw them in the microwave before heating them with the beans and sauce.

The cornbread mix is almost always a bargain and although I rarely make cornbread with it I keep it on had for casseroles like this one. Check the label on your cornbread and use the ingredients called for on it, the ones in the list are what I have found to be pretty standard.

Onions, milk, eggs and butter are always in my kitchen so you can understand why I fall back on this casserole regularly.


I have also doubled this with fantastic results for a crowd, just bake it in a 13”x9” and is will be fine.


Corn Dog Casserole

! (28 oz) can baked beans (any variety)
1 (14 to 16 oz) package of “little smokey” sausages
½ cup barbecue sauce (any variety)
1 small onion chopped

1 (6- 8.5 oz) box or pouch of corn bread mix
ingredients to make cornbread mix:
1/3 cup milk
2 Tablespoons melted butter
1 egg

Heat oven to 375 degrees Fahrenheit

In a large saucepan combine the baked beans, sausages, bbq sauce and onion. Place pan over medium heat until bubbly. Stir the pan frequently while it heats.

Meanwhile combine the cornbread mix with the ingredients called for on the box/pouch.
When the bean mixture is hot and bubbly pour into an 8”x8” baking dish. Spoon the cornbread batter over the beans in the casserole dish spreading as well as you can.

Place the casserole dish in the preheated oven and bake for 20 to 25 minutes. The top of the cornbread should be golden brown and the bean mixture should be bubbling up.


Wednesday, November 21, 2012

Ranch Turkey Pizza

Okay, another quick and easy dinner made up from some of the leftover turkey from the big feast.

This one takes a shortcut and uses one of those pre-baked pizza crusts that we can buy at the grocery store. I picked up a package of whole wheat crusts this time and got the bonus of two crusts for the price of one. Since the crust is already baked this dinner can be on the table in about 30 minutes which is fantastic with all the extra activities that seem to hit from now until Christmas.


Ranch Turkey Pizza

1 pre-baked pizza crust (12” size)
3 Tablespoons of your favorite Ranch Salad dressing
1 ½ cups diced cooked turkey
1 cup fresh spinach leaves
1 cup chopped fresh tomato
2 chopped green onions
½ teaspoon Italian herb seasoning
1 ½ cups shredded Mozzarella cheese

Pre-heat oven to 450 degrees Fahrenheit

On a greased pizza pan (or flat cookie sheet) place the pizza crust.

Spread the Ranch dressing evenly over the top of the crust. Top with remaining ingredients.

Cook in pre-heated oven for 10 to 15 minutes or until hot and cheese is melted. 


Monday, November 19, 2012

Turkey Pot Pie

This is comfort food at its best, a wonderful warm dish that tastes like it came from grandma's kitchen. Okay, so it isn't low fat but once in while we need to treat ourselves. My feeling is if we eat healthy most of the time and we indulge once in a while we will be happier and less apt to go wild and eat badly all the time.

Since we are talking about leftovers from Thanksgiving this week I had to include this one. I used a pre-made pie crust from the grocery store. I usually have a couple of these in the fridge to use when I am short on time. Also if you just spent the last several days making a big dinner for the holiday you deserve to take a few shortcuts now. If you want to make a pie crust go for it! Use your favorite recipe, or plan ahead if you make pumpkin pie for the holiday and make an extra crust then.

I used thawed frozen mixed veggies in my pot pie but if you have some veggies leftover use those up first. I love this with leftover broccoli in it but it is good with whatever veggie you have on hand.

I made my pot pie with half and half but feel free to use any milk you have on hand, I like the richness of the half and half with the broth. My gravy mixture came out a little thin so I added a bit more flour to the recipe here so yours will should be thicker and richer than mine in the picture.


Turkey Pot Pie

¼ cup butter
1 medium onion
1 cup sliced mushrooms
2 cloves of garlic (minced or grated)
½ teaspoon dry sage
Salt and pepper to taste
1/3 cup all purpose flour
2 cups broth (turkey or chicken)
1 cup half and half (or any fat level milk)
2 cups mixed vegetables (thawed if frozen) or leftover veggies
2 cups cubed cooked turkey

1 pie crust, unbaked

Preheat oven to 450 degrees Fahrenheit

Melt the butter in a large saucepan over medium heat. Add the onions and mushrooms and saute until softened. Add the garlic, dry sage and salt and pepper, continue to cook a few minutes more, just until the garlic starts to cook and release its aroma.

Stir the flour into the butter and onion mixture and allow to cook a minute or so. Slowly stir in the broth and bring to a boil stirring constantly. Allow to boil for a minute or so then stir in the half and half. Bring back to a simmer, stirring constantly.

Add the veggies and turkey to the mixture in the saucepan and allow to come back to a simmer stirring occasionally

Pour the mixture into a large (10") glass pie dish. Top with the pie crust.

Be sure you have the pie dish on a rimmed baking sheet.

Bake in preheated oven for about 25 minutes.
Allow to cool 5 minutes before serving. 


Monday, November 12, 2012

Apple Juice Brined Turkey

Well, Turkey Day is almost here do you have your menu all figured out yet? Do you go with a very traditional menu or do you modernize those traditional flavors a bit?

At our house we start “auditioning” recipes for the big day sometime in mid October. I actually start looking for recipes and collecting ideas in about January but things start to come together about a month or so before the holiday. This auditioning of the recipes is a long standing tradition and we take it very seriously. If you happen to be at our house for dinner on one of the nights we are doing this you will be expected to join in the conversation. We discuss at length the merits and downfalls of each dish over dinner. We compare it to other recipes in the same category that we may have tried recently and with those recipes we have served other years. We discuss if the recipe will “play well” with the rest of the meal. It really is a fun tradition, you should try it at your house.

This year I had run into this different brine recipe for the turkey, I always brine my turkey (actually any poultry I am going to roast/ grill whole) and I have shared my traditional recipe on this blog in the past (check it out here  just double the ingredients for a turkey) This year I wanted to try something a bit different, a bit more special. I was looking through my cookbook collection and found this recipe well, I found the starting point for this recipe since I can never leave any recipe alone. I did make some changes from the original. Last week we gave it a try with a turkey breast and it was amazing! The only really problem I found was that the skin got very dark very quickly. I think because of the higher sugar content of the brine from the one I use normally. It still tasted fantastic not burnt at all it was just dark in color. The flavor the brine gave the meat was so fantastic definitely worthy of a place on the holiday menu this year.

I also now have my gravy for Thanksgiving Day in the freezer waiting for me. This is important since we almost always cook our turkey on Thanksgiving on the grill. We love the flavor that the charcoal grill gives the meat but it doesn't work very well for gravy because the drippings always get ashes in them. For this reason I always make my gravy up a week or two before the holiday and freeze it. I then defrost it the day before and put it in my small (1 quart) slow cooker to re-heat for dinner. So easy and one less thing to have to think about when company arrives.

You will need a large container to hold your turkey and the brine, I use my cooler. I add plenty of ice and let it sit in my kitchen which tends to be a pretty cold room. If you have a garage that would also be a good place to let your turkey do its time in the brine.

Remember to allow plenty of time for the turkey to defrost if you are buying a frozen one. I find that since I keep my fridge a bit colder than most people do I need to allow an extra day or two from what most of the websites say. Also you will need to have your turkey thawed out the day before you are going to cook it since it will need to sit in the brine for a good 18 hours.

For the apple juice in this recipe you don't need anything fancy just make sure it is actually apple juice and not a “juice cocktail” with a lot of added sugar. You do need a 100% juice for this. I am going to probably use the correct amount of frozen concentrate with water for mine depending on what is the better value. I am assuming you are oven roasting your turkey so I am including the recipe for the fantastic gravy.


Apple Juice Brined Turkey

Brine and turkey

1 gallon of apple juice (no sugar added)
2 cups brown sugar
1 cup kosher salt
½ cup chopped fresh (or 2 Tablespoons dry) sage
½ cup fresh thyme leaves (or 2 tablespoons dry)
2 Tablespoons whole peppercorns


1 Turkey, thawed if purchased frozen (rinsed, neck and giblet package removed)
water and ice as necessary to cover turkey

1 onion (cut in quarters)
1 lemon (cut in quarters)
a few springs of fresh thyme
a few sprigs of sage
melted butter or oil to coat turkey

Gravy and basting sauce

½ cup butter
1 Tablespoon fresh sage
5 cloves garlic (minced or grated)
¼ cup all purpose flour
2 cups chicken or turkey broth
salt and pepper to taste

Reserve 1 cup of the apple juice to use in the basting mixture (be sure to refrigerate)
In a large container combine the rest of the apple juice, the brown sugar, kosher salt, ½ cup fresh sage (or 2 Tablespoon dry) ½ cup fresh thyme (or 2 Tablespoon dry) and the whole peppercorns. Stir until the sugar and salt are dissolved. Add the turkey to the brine mixture and add enough water to completely cover the turkey. If you are brining in a cooler add ice with the water.

Allow to brine for about 18 hours.

Remove turkey from brine 1 hour before time to begin cooking. Rinse turkey to remove excess brine and allow the skin to dry. Place quartered onion, lemon and sprigs of fresh herbs in cavity of turkey.

Tuck wing tips under back of turkey and tie legs together. Coat skin well with melted butter or oil.

Roast at 325 degrees Fahrenheit for time needed for the size of your turkey. (there are many charts online and in cookbooks to find the correct time)

Combine the reserved apple juice with the remaining ½ cup butter and garlic in a small saucepan. About an hour before the turkey is expected to be done begin basting the skin with this mixture about every 15 minutes, using all the mixture.


Check the temperature of the turkey in the thigh to be sure it is cooked. Don't rely on the pop up timer, I have rarely had them give me an accurate indication of doneness.

When your turkey is done remove from oven allow to rest for at least 15 minutes.

Meanwhile pour the drippings into a measuring cup. Skim off and reserve the fat.

In a medium saucepan combine ¼ cup of the fat from the drippings with the flour to form a roux. Add the liquid from the drippings along with the 2 cups of broth stirring to make a gravy. After the gravy comes to a boil taste and season with salt and pepper as needed.


Friday, September 28, 2012

Meat and Pasta Casserole

This has always been a dish that lands on our dinner table on a regular basis. When my oldest son was little he absolutely loved this so that was one reason (we all actually have loved this one from the first time I made it) Another reason I have always made it a lot is that it is just so versatile, it really is what you want it to be each time. Feel like Mexican food this casserole can give you that. What if you want Italian, no problem, this casserole will go there too. The reason is this is really just a basic road map, you fill in the blanks and make it just the way you want it.

First you choose what ground meat you want to use this time. I have made this with all of the following: ground beef, ground chicken, ground turkey, ground pork, bulk Italian sausage, bulk pork sausage and Chirizo. All of them worked wonderfully! So whatever you have on hand or in the mood to use.

The canned soup: any of the condensed cream of whatever soups, cheddar cheese soup, nacho cheese soup, or tomato soup. Just so it is a condensed soup (you know the ones you would add water or milk to) and it has a creamy base.

Seasonings: dried herbs, (whatever goes with what you have in mind) some ideas: basil, tarragon, dill, oregano, Italian seasonings, etc
Spices: chilli powder, cumin, caraway seed, etc

Pasta: whatever shape you have on hand elbows, ziti, egg noodles just about any shape.

Crumb topping: dry bread crumbs (mix with a bit of melted butter), Parmesan cheese (mixed with bread crumbs), fresh bread crumbs (mix with a bit of melted butter) crushed tortilla chips, crushed potato chips, chow mien noodles (crushed)

So you see you really can go anywhere with this. I love to do the following combinations:

Ground beef, chilli powder, cumin, cheddar cheese soup and top with crushed tortilla chips.

Any ground meat, Italian seasonings, tomato soup and topped with a mixture of dry bread crumbs, Parmesan cheese and butter


Meat and Pasta Casserole

4 oz pasta
1 pound of ground meat
1 onion, diced
2 ribs celery, sliced
1 cup sliced mushrooms
(1 clove garlic, chopped optional)
1 (10 to 11 oz) can condensed soup, cream based
½ cup sour cream
½ cup milk
1 Tablespoon chopped fresh parsley
½ to 1 teaspoon seasonings of your choice

Crumb topping, about ¾ cup total or to cover your casserole dish


Preheat oven to 375 degrees Fahrenheit

Cook pasta according to directions on package, drain when cooked

Brown meat until cooked through and set aside. In the same skillet sweat the vegetables until slightly tender.

Combine canned soup, sour cream and milk until mixed well. Add seasonings, cooked meat. Cooked pasta and vegetables.

Pour mixture into an 8” x 8” casserole dish

Top with topping

Bake in preheated oven for 30 to 35 minutes until heated through and top is browned.

Wednesday, September 26, 2012

Sweet and Sour Chicken

This is yet another of my recipes for chicken in the slow cooker. I know a lot of us are always on the look out for new ideas for both chicken and slow cooker recipes. I will say that for my taste this is really too sweet but I know other family members that absolutely love it. I have a feeling a lot of the sweetness level also depends on the brand of sweet and sour sauce you use. My grocery store only carries one brand and it is very sweet. Also you can always add some heat to this too.

Since this recipe requires you to pay a bit of attention at the end of the day plan it for a day when you have some time before dinner. Also it gives the perfect opportunity to out some brown rice in the rice cooker while dinner finishes up.


Sweet and Sour Chicken

1 ½ to 2 cups carrot sticks
1 green bell pepper, sliced
1 medium onion sliced
2 lbs boneless, skinless chicken thighs
½ teaspoon red pepper flakes
1 jar (about 9 oz) sweet and sour sauce
1 (20 oz) can pineapple chunks


Place the carrots, bell pepper and onion in the slow cooker. Top with the chicken and sprinkle with the pepper flakes.

Cook on low for 6 to 7 hours until cooked through.

Drain off and discard the liquid that has accumilated in the slow cooker.
Add the sweet and sour sauce and the pineapple chunks to the chicken and vegetables in the slow cooker and heat on low for an additional hour.

Serve over rice

Tuesday, September 25, 2012

Salmon Chowder

There is nothing like a warm bowl of soup for dinner on a cool fall evening. This one is so wonderfully creamy and tasty that I know you will love adding it to your meals this fall.

I am starting with a salmon fillet but if you want to use a couple of cans of salmon feel free to do so, just skip the first part of the recipe. It will be just as good and a bit quicker too.


Salmon Chowder


(poached salmon)
½ cup water
¼ cup dry white wine
1 carrot, sliced
½ onion, sliced
1 sprig parsley
salt and pepper to taste
½ pound salmon fillet (cut to fit pan)

In a medium size skillet combine the water, wine, and veggies bring to a simmer and add the salmon fillet pieces. Cook at a low simmer until fish is cooked through, about 5 minutes. Remove fish from pan and allow to cool. Strain liquid and reserve for chowder.


(chowder)
salmon and its cooking liquid (or a large can of salmon)

4 slices bacon, chopped
½ onion, diced
2 cloves garlic, finely chopped
reserved salmon cooking liquid
1 cup water
1 cup chicken broth
2 cups finely diced potato

2 cups half and half

Cook bacon until crisp and remove from pan. Sweat the onion and garlic in the bacon drippings until softened. Add the salmon cooking liquid, water, chicken broth and potatoes bring to a simmer and cook until the potatoes are cooked through and very tender.

Meanwhile flake cooked salmon (I like to use my finger for this to be extra sure I don't miss any bones)

When the potatoes are cooked add the half and half and the cooked salmon.
Heat through
Taste and adjust the seasonings.

Thursday, September 20, 2012

Cajun Chicken

It always seems like once the month of September rolls around I get way busier. After all school has started which translates to lots more driving and planning. And then all the late summer produce it getting ready and begging me to do something with it. With all that going on some days I just don't feel like making a big dinner. Unfortunately, my son still thinks he needs to eat (didn't I just feed him yesterday?? just kidding) Days like this need quick and easy dinners from the slow cooker.

And this brings us to today's recipe. Yes it is yet another chicken in the slow cooker recipe. I love these because I can put them on to cook and then get other stuff done. Also like a lot of my favorites this goes over some rice at the end of the day. That means all I have to do is get my rice cooker to cook the rice portion of the dish and I am done. If I choose to make a salad or cut up some raw veggies great if not, what the heck this has some veggies in it and we tend to snack on fruits and veggies a lot anyway. Some days you just need to have a one dish meal that you don't have to fuss over.

This is called Cajun Chicken for a couple of reasons, first off you start off the dish with the Cajun tradition of the holy trinity (bell pepper, onion and celery) and secondly the dish utilizes one of the commercial brands of Cajun Seasoning available in the grocery store. Use whatever brand your store carries (there are probably a ton of recipes online for a dyi version too)

This dish does require a few minutes of prep time to cut up the veggies, cook the bacon, sweat the veggies and brown the chicken, it took me about 15 minutes to get all that done. Once the dish cooks all day in the slow cooker (at least 8 hours) it really needs nothing else done to it so other than getting the rice cooked you are set to sit down and eat.


Cajun Chicken

3 slices bacon, chopped
½ cup chopped green bell pepper
¼ cup chopped onion
¼ cup chopped celery
8 boneless, skinless chicken thighs
2 teaspoons Cajun seasoning blend
1 (14 ½ oz) can diced tomatoes (with the liquid)


Cook bacon in skillet until crispy. Add the bell pepper, onion and celery and cook just to soften.

Place bacon and veggies in the bottom of a 3 ½ to 4 quart slow cooker.

Sprinkle chicken on both sides with about ½ the Cajun seasoning. Brown the chicken in the remaining bacon fat in skillet.

When chicken is nicely browned (not cooked just browned on the outside) add it and any drippings in pan to slow cooker.

Stir the remaining teaspoon of Cajun seasoning into the canned tomatoes and pour over chicken in slow cooker

Cover and cook on low for 8 to 9 hours.

Serve over a bed of rice

Serves 4

Tuesday, September 18, 2012

Creamy Scallops with Angel Hair Pasta

OK, first let's get the fact that this is really rich and loaded with calories out on the table. Oh yeah, this one is definitely not an everyday dish but it is so good, so luscious and so worth being in your recipe file for special occasions. So save this recipe for a special occasion and enjoy it then go back to healthier fare the rest of the week.

One thing I have noticed about cooking with scallops is that sometimes they seem to give off a lot more liquid into the pan than other times. I am not going to try to figure out why and explain it to you. Instead I will tell you how to deal with it. If you do find that your scallops are really wet and you end up with a lot of sauce use a slotted spoon and remove the scallops from the pan and let them join the pasta in the serving bowl while you cook the sauce down a bit. One of the worst things you could do to this dish is over cook the scallops. They are very delicate but will turn to little wads of rubber if you overcook them.
Don't be concerned about them getting cold sitting there waiting the sauce will warm them up just fine when you pour it over them and toss them and the pasta in it.

I do use a white wine in this sauce my preference for this dish is a nice chardonnay. It doesn't have to be very expensive to be good either. If you are going to serve wine with the dish I would recommend the same bottle of chardonnay to with it. It will stand up to the richness of the dish just fine. If you don't want to add the wine just leave it out no problem I just add it because I like the added layer of flavor it gives.


Creamy Scallops with Angel Hair Pasta


8 oz angel hair pasta
2 Tablespoons olive oil
¾ pound small scallops (fresh or thawed)
2 medium tomatoes, peeled and seeded
2 cloves garlic, finely minced
¼ teaspoon salt
¼ teaspoon freshly ground pepper
½ cup white wine
1 cup heavy cream
1 Tablespoon chopped fresh oregano
4 oz crumbled feta cheese

Cook the pasta as directed on the package. When cooked drain well and reserve in a large bowl.

While the pasta is cooking heat the oil in a large skillet then add scallops, tomatoes and garlic. Cook over medium heat until the scallops just begin to turn opaque. Add the wine and cook to reduce. (If the scallops cook before the sauce reduces to about half remove the scallops and add them to the pasta in the bowl)

When the sauce has reduced to about half add the cream and oregano and heat through (just to bubbling)

Pour sauce over pasta and toss. Add the feta cheese and toss again


Thursday, September 13, 2012

Curry Chicken

This is definitely one of the recipes that falls under the heading “torture by slow cooker” because it just smells wonderful as it cooks. The house will be filled with the wonderful warm aromas of curry by day's end.

This is a fairly quick cook as slow cooker recipes go, about 6 or 7 hours so it is more for one of those days when you are busy running some errands or such rather than a day off at work. If left much beyond the 7 hours the chicken will dry out. You might give it a try with chicken thighs in place of the chicken breast if you want to let it sit longer.

Be sure to pair this with a nice bed of rice, you don't want to loose any of the wonderful sauce this cooks in.

And speaking of that wonderful sauce, the base of it is a jar of mango chutney. I usually find it in jars that hold about a cup and that is perfect for this recipe.


Curry Chicken
4 boneless, skinless chicken breast halves (about 2 pounds total)
1 (15 oz) can garbanzo beans, rinsed and drained
1 medium onion sliced
1 red bell pepper chopped
1 cup fresh sugar snap peas
1 jar mango chutney (about 1 cup)
¾ cup water
2 Tablespoons cornstarch
1 ½ teaspoons curry powder
¼ teaspoon salt
¼ teaspoon pepper

Layer the chicken, beans, onions, bell pepper, and sugar snap peas in the bottom of your 3 ½ to 4 quart slow cooker. I usually do 2 layers of each

Combine remaining ingredients stirring to combine and pour over chicken mixture in slow cooker.

Cook on low for 6 to 7 hours or until chicken is cooked through.

Serve over a bed of rice.

Thursday, August 2, 2012

Brown Sugar Glazed Salmon on the Grill


This is a really quick little dress up for salmon that I think you will really enjoy. It has a hint of sweetness offset by a bit of sour and hint of heat. How can it get any better than that.

The last time I made this we used the amounts for the sauce that I am giving you here and for most people they would probably be perfect. Next time my son wants me to double the Sriracha because he felt it was not spicy enough. So if you like spicy you might want to increase the hot sauce a bit when you make it. I thought it was wonderful and liked the fact that none of the flavors (spicy, sour, sweet) was in the forefront, they played well together and were very balanced.

If you are not familiar with Sriracha sauce I highly recommend you add it to your list of staple ingredients to keep on hand. You will find it with the Asian foods in most grocery stores. It is easy to identify by the rooster on the label. It originates in Thai cooking and is just wonderful in so many dishes. It adds not only a bit of heat but also a garlicky slightly sweet almost smokey flavor to anything you add it to. I use it to season so many things.

If you are braver than I am you can cook this right on the grill rack, I cooked ours on a piece of well oiled foil. I didn't want to risk loosing any of the fish to the grill. I have had bad luck in the past trying to deal with delicate fish on the grill racks. For me the aluminum foil underneath just is a bit of insurance that I will get to eat the fish and not watch it fall through the rack to the charcoal below. You still get the smokiness that we are looking for on the grill so it is up to you. I think I really should go get a fish basket for the grill but I never remember that when I am in the store, I remember it when I am facing the grill with a chunk of fish. The only real downside to cooking on the foil was we lost the wonderful salmon skin to the foil, it stuck and was not to be removed. With a fish basket I am sure the skin would have been left intact on the fillet.


Brown Sugar Glazed Salmon on the Grill

1 (1 lb) salmon fillet (skin on)
oil
1 Tablespoon brown sugar
2 teaspoons vinegar
1 teaspoon honey
1 teaspoon prepared mustard (any variety)
¼ teaspoon Sriracha Sauce (or to taste)
Fresh chopped chives


Look over your salmon and remove any remaining bones (they always seem to miss a few) and use the oil to coat the skin.

Lay skin side down on well oiled aluminum foil or in a fish basket.

Combine brown sugar, vinegar, honey, mustard and Sriracha sauce in a small bowl. Brush the salmon with the sauce.

Grill skin side down, over medium coals 10 to 15 minutes or until the salmon flesh flakes easily and is opaque.

Sprinkle with chopped chives just before serving.

Tuesday, July 31, 2012

Reuben Sandwich Squares


This is another of my favorite make-ahead packable lunches. If you like a Reuben sandwich this is really worth making up. You bake off the sandwiches, cut into serving size portions, cool, wrap and freeze. Then in the morning you pull the frozen sandwich out of the freezer and pack in your lunch bag. It should thaw out in about 4 to 6 hours at typical room temperature and it will have the bonus of keeping the rest of your lunch cold too. If you use an insulated bag you might want to thaw it overnight before packing it to ensure it is thawed by lunch time.

These are great cold or at room temperature or if you have a microwave or toaster over available at lunch time go ahead and warm it up.


By starting with a box of hot roll mix most of the work of bread making is done for you. You don't even have to knead the bread to get the fabulous home-made bread experience.

Every time I make this I think I need to make some other versions of the sandwich squares. Almost any meat cheese combo you love in a sandwich would work wonderfully in here. How about swapping the corned beef with ham and the sauerkraut- thousand island dressing mixture for some honey mustard, keep the Swiss cheese and you would have a killer ham and Swiss to take with you. Or maybe turkey and provolone with some cranberry sauce. The possibilities are endless, just use you imagination.

Let me know if you try your own combinations and tell me your favorites so I can try them too.


Reuben Sandwich Squares

1 package hot roll mix (about 13.5 oz)
ingredients called for on box of mix

1 cup sauerkraut, rinsed and drained well
½ cup thousand island salad dressing
¼ cup tomato sauce

12 oz Swiss cheese, shredded and divided
8 oz deli style corned beef (or pastrami)
2 teaspoons vegetable oil
caraway seeds

Preheat oven to 350 degrees Fahrenheit
Grease a 13”x9” baking pan

Prepare the hot roll mix as directed on package through the mixing step. Divide the dough into 2 equal balls and let rest, covered for 10 minutes.

Set one of the balls of dough to the side for later (that will be the top layer of your sandwich.

Roll the other ball of dough into a rectangle that is approximately 13”x9” and place in your prepared pan. Stretch to fit bottom of pan. Set in a warm place to rise for 20 minutes then bake in 350 degree oven for 10 minutes or until light golden brown.

Meanwhile combine the drained sauerkraut, thousand island dressing and ketchup in a small bowl and set aside.

When bottom crust is baked remove from oven top with half the Swiss cheese, all the corned beef, the sauerkraut mixture and finally the remaining cheese. Don't go all the way to the edge of the crust, leave a border of bread so your top crust has something to grab onto.

Roll the 2nd ball of dough out to 13”x9” and place over top of cheese layer. Press the top crust to the bottom crust.

Let rise 10 minutes

Brush top of crust with olive oil and sprinkle with caraway seeds.

Bake at 350 degrees for 30 to 35 minutes or until dark golden brown and cooked through.

Remove from pan and cool on wire rack 1 hour. Cut into 6 equal squares, wrap, label and freeze to enjoy in future lunches.

Will keep in freezer up to 1 month.

Tuesday, May 10, 2011

Family Favorite Chili


This is my Go-To Chili recipe and what my kids think of when they crave chili. I have been working on it for many years and it is really still a work in progress because I do still change it up a bit from time to time. At this point I have to say it is excellent though.

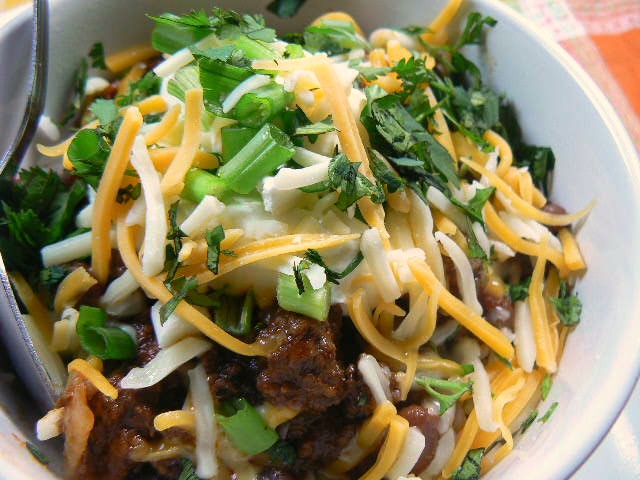
At our house we always serve chili (homemade or out of a can) over rice in a big soup bowl. There is a bit of a story there. Many, many, many (you get the point) years ago, back when I was a young bride we had some very dear friends that dropped by one day. As dinner time neared they were invited to stay to eat (without consulting me as to whether this would be in the cards) and I went into a slight panic mode. You see, I had planned chili for dinner and there really was only enough for 2 not nearly enough for 4. EEK! What to do?? I started going through the meager supplies in my cabinets and found a box of rice. Aha, I thought rice will stretch almost any meal. So I made up a nice big batch of rice, we filled our bowls with the rice first, topped it with the chili and then some toppings to garnish and a new family favorite was born. Now according to all 4 of my kids if there isn’t rice under it, it just isn’t chili!

You will find this to be a fairly mild chili, at least by many standards and yes, I have beans in there. I know, real chili isn’t supposed to have beans but I like them there.

You can top this with your favorite toppings, I have suggested our favorites but anything goes. This recipe multiplies easily and makes for a great inexpensive dish to entertain with. Just increase everything in proportion and taste as you go to adjust.


Family Favorite Chili

1 pound lean ground beef
2 medium onions, chopped
3 cloves of garlic, chopped
1 jalapeƱo pepper, finely chopped
1 Tablespoon chili powder (your favorite brand)
1 teaspoon ground cumin
¼ teaspoon salt
¼ teaspoon pepper
1 Tablespoon unsweetened cocoa powder
1 teaspoon dry oregano
½ cup red wine
1 (14.5 ounce) can diced tomatoes
1 (8 ounce) can tomato sauce
½ cup water
1 (15-16 once) can red kidney beans, drained and rinsed
1 (15-16 ounce) can black beans, drained and rinsed

In a large pan (soup pot or dutch oven) combine the meat, onion, garlic, jalapeno, chili powder, cumin, salt and pepper and cook over medium heat until meat is cooked through and veggies are tender.

Add cocoa powder and dry oregano and stir to combine. Add red wine and stir up any bits from the bottom of the pan. Cook until the liquid is almost all gone.

Add tomatoes, tomato sauce, and water bring to a boil and reduce heat to a simmer. Cover and simmer for at least 2 hours, 3 is better.

Add the canned beans and cook covered for 20 minutes to heat through.

Serve over in bowls over rice and topped with sour cream, shredded cheese, sliced green onions and chopped cilantro.