Friday, March 9, 2012

Lemon Chicken

Things have been pretty rough around my house for the last few months due to a family member being very ill. Thankfully I tend to keep my freezer fully stocked with meals that are easy to fix so we had easy to prepare meals even when I really didn't feel like cooking. Now I do need to restock however. So with an eye toward that I am going through my freezer recipes and I found my recipe for Lemon Chicken which happens to be one of my all time favorite chicken recipes. I was lucky to find an excellent price on chicken parts the other day so I made and froze several bags of this as well as served it to my son for dinner that same day.

The coolest thing about this recipe (other than the the fantastic flavor) is that it is even better after it has frozen and thawed again. The flavor of the lemon gets carried all the way through the meat by the action of freezing and thawing and it is incredible.

This recipe is really easy to scale to the number of servings you need simply by the number of pieces of chicken you put in each bag. I will explain the amounts as we go. The following amounts are what you will need per bag for about 2 to 3 servings. If you want to make bags with more servings (4-6) double the amounts, if you are bagging up single servings use half the given amount per bag.

Lemon Chicken

Chicken parts of your choice (to serve 2 -3 people)
1 teaspoon dried thyme
1 teaspoon salt
½ teaspoon pepper
Grated or crushed garlic about a large clove (to taste)
1/3 cup lemon juice


Figure out how many bags of chicken you will be making and line the freezer bags up on the counter. Add the chicken parts to the individual bags. Now add the rest of the ingredients given to each bag. I work mine like an assembly line, adding the chicken to all the bags then the thyme goes in all the bags, then the salt on down the list.

When all the ingredients are added seal each bag getting out as much of the air as you possibly can. Then kind of massage the bags to thoroughly mix the ingredients and make sure the chicken is coated well. Label and freeze the bags.

When you want to serve the chicken thaw in the fridge overnight. Place the contents of the bag into a glass baking dish (2-3 serving fit nicely in an 8x8) arranging the chicken pieces skin side down. Bake at 450 degrees (Fahrenheit) for 20 minutes, turn chicken over and cook an additional 15 to 20 minutes until done.

This goes really well with a nice serving of brown rice (which will cook in your rice cooker in just about the same amount of time as the chicken cooks)

Thursday, March 1, 2012

Banana Split Sauce

I know we've all done it at least once, and this week it happened to me. I saw the pretty box of strawberries in the grocery store, and just grabbed one. Well, I didn't really take the time to look at them, or I would have noticed that most of the berries were way under-ripe. I was distracted with other things, and mindlessly picked them up with out thinking.

When I got home I opened them and found to my dismay that all but a few of the strawberries were just blah. My son and I ate the few ripe ones we found, and I took some of the moderately ripe ones and mixed them with sugar to top some ice cream, creating a serviceable dessert. Now what to do with the rest of the 3 pound box? (Oh, did I mention it was the huge box?) My thought had originally been to make a batch of jam since we are out, but these berries just weren't up to the task.

I scanned the items in my cabinets and started to formulate a plan. Maybe if I cooked them with some sugar and added some other ingredients that play well with strawberries I could create a sauce. And I was so right. You are going to love this sauce but be warned; it is not low calorie in any way. It is so rich! It went really well on both ice cream for dessert and on waffles for breakfast (although I felt the need to take a nap after breakfast, so maybe this should be saved for a weekend) I'm sure you will enjoy this as much as we do, and it will become a regular on your table.


Banana Split Sauce

4 cups of cut up strawberries
2 cups sugar (or amount your berries need)
8 oz can pineapple tidbits
juice of 1 lemon
¼ teaspoon salt
1 Tablespoon cornstarch
2 Tablespoons water
¼ chopped nuts (I had walnuts)
1 cup chocolate chips
banana (at serving time)

Combine the berries, sugar, juice from the pineapple (reserve pineapple to add in a little while), lemon juice and salt. Allow this to simmer until the berries are soft and sugar is dissolved. Mash the berries (a potato masher works well for this) and taste. Add more sugar if needed.

Combine the cornstarch and water and stir into strawberry mixture, bring to a simmer and stir constantly until thickened. Add the reserved pineapple and the nuts/

Allow to cool for a bit then add the chocolate chips.

To serve spoon the warm sauce over sliced bananas on your favorite base. This goes incredibly well over both ice cream and waffles. I am sure that both pancakes and pound cake would be awesome as well.


Sunday, December 4, 2011

Cranberry Sauce

Like most of my recipes this one is very adaptable to what your family loves and what is on hand when you make it.


I actually buy a bunch of bags of cranberries each winter and throw them in the freezer so we can enjoy this sauce year round. We really love it on sandwiches of all kinds and on the side with all kinds of poultry too. It also can be made into a wonderful barbecue sauce in the summer, I'll try to remember to post that when the time comes.


In the demo I used orange juice and diced apples. The main reason I used those is because that was what I had on hand. This sauce is so good with almost any fruit juice and fruit that you have or is in season. In the summer we love it with fresh mangoes to give it a tropical feel (usually I look for one of the tropical juice blends to use in that version) so use what you love and use my recipe as your road map.


The amaretto is totally optional too, if you don't like it or don't have it leave it out. We really do love the subtle flavor it adds though. 


Find the video here


Basic Cranberry Sauce

In a 3 qt saucepan bring

1 cup sugar
1/2 teaspoon pumpkin pie spice
2/3 cup orange juice
1/3 cup amaretto

to a boil over medium-high heat stirring occasionally to dissolve sugar

when mixture boils add package cranberries (12 oz)
1 apple, diced (about 1 cup)

cook uncovered until skins pop

Reduce heat medium and cook for about 10 minutes or until thickened.

Cover and refrigerate

Sunday, November 27, 2011

Pineapple-Upside Cake

I am back and hopefully you will enjoy the changes I am planning to make on this blog. The most exciting change is that I will be doing videos to go with each (or at least most) of the recipes that I post. I think so many people learn better and are more confident to try something on their own if they can watch someone else do it first. Be sure to look for the link to the video in the post below.


Pineapple-Upside Cake


This one of the favorite desserts in my house and I am sure you and your family will love it too. It is also a very easy cake to make and it is usually the first cake I teach people to make. This is a very forgiving recipe.


I make mine in my 10” cast iron skillet and if you are lucky enough to own one use it but, if you don't have this treasure in your kitchen an 8” or 9” square baking dish will work almost as well.


This is a recipe that is adaptable too, if you don't want to use pineapple you can use almost any canned fruit. I have used canned peaches, apricots, pears  and even Fruit Cocktail all with excellent results. Just be sure to use the fruit packed in juice since you will need that for the cake recipe. I have also used thawed frozen berries as well and it was yummy that way too, in this case just use a mild juice or even milk in the cake batter.


If you are not a fan of Maraschino Cherries you can leave them out entirely or substitute shredded coconut or walnut (or pecan) halves.


Like all my recipes I want you to make this your own, Use what you love and what your family loves to make a dessert everyone will love.


Preheat oven to 350 degrees Fahrenheit

Melt 1/3 cup butter in a 10” skillet  (in the oven)


Meanwhile

Beat

2 eggs until thick and lemon colored (about 5 minutes)


Gradually beat in

2/3 cup sugar


Beat in all at once

6 Tablespoons juice from fruit

1 teaspoon vanilla


Stir together and beat in all at once

1 cup flour

½ teaspoon baking powder

¼ teaspoon salt


Set batter aside


Add ½ cup brown sugar to butter in skillet and stir

Arrange sliced pineapple and cherries in desired patter on the butter sugar combination


Carefully pour cake batter over fruit

Bake at 350 degrees for 45 minutes


Immediately turn onto a serving platter.


Best served warm

Monday, October 17, 2011

I'm Back

I am back, or at least I hope I'm back. My summer has been a series of way too many things going wrong and I have hardly even been in my kitchen. Since I haven't been cooking much it was next to impossible  to post recipes.


I think life may soon be back to normal (or what passes for normal in our house) I am really ready to get back to both cooking and posting. I am so tired of purchased baked goods and quick meals (or worse yet that stuff I have been getting at the drive thru window)

Tuesday, May 10, 2011

Family Favorite Chili


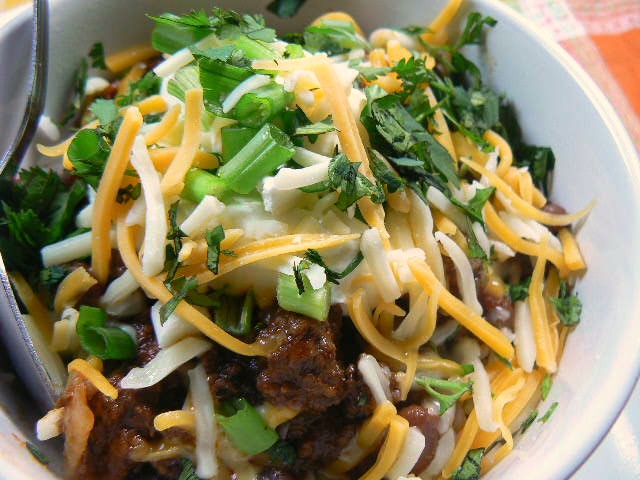
This is my Go-To Chili recipe and what my kids think of when they crave chili. I have been working on it for many years and it is really still a work in progress because I do still change it up a bit from time to time. At this point I have to say it is excellent though.

At our house we always serve chili (homemade or out of a can) over rice in a big soup bowl. There is a bit of a story there. Many, many, many (you get the point) years ago, back when I was a young bride we had some very dear friends that dropped by one day. As dinner time neared they were invited to stay to eat (without consulting me as to whether this would be in the cards) and I went into a slight panic mode. You see, I had planned chili for dinner and there really was only enough for 2 not nearly enough for 4. EEK! What to do?? I started going through the meager supplies in my cabinets and found a box of rice. Aha, I thought rice will stretch almost any meal. So I made up a nice big batch of rice, we filled our bowls with the rice first, topped it with the chili and then some toppings to garnish and a new family favorite was born. Now according to all 4 of my kids if there isn’t rice under it, it just isn’t chili!

You will find this to be a fairly mild chili, at least by many standards and yes, I have beans in there. I know, real chili isn’t supposed to have beans but I like them there.

You can top this with your favorite toppings, I have suggested our favorites but anything goes. This recipe multiplies easily and makes for a great inexpensive dish to entertain with. Just increase everything in proportion and taste as you go to adjust.


Family Favorite Chili

1 pound lean ground beef
2 medium onions, chopped
3 cloves of garlic, chopped
1 jalapeƱo pepper, finely chopped
1 Tablespoon chili powder (your favorite brand)
1 teaspoon ground cumin
¼ teaspoon salt
¼ teaspoon pepper
1 Tablespoon unsweetened cocoa powder
1 teaspoon dry oregano
½ cup red wine
1 (14.5 ounce) can diced tomatoes
1 (8 ounce) can tomato sauce
½ cup water
1 (15-16 once) can red kidney beans, drained and rinsed
1 (15-16 ounce) can black beans, drained and rinsed

In a large pan (soup pot or dutch oven) combine the meat, onion, garlic, jalapeno, chili powder, cumin, salt and pepper and cook over medium heat until meat is cooked through and veggies are tender.

Add cocoa powder and dry oregano and stir to combine. Add red wine and stir up any bits from the bottom of the pan. Cook until the liquid is almost all gone.

Add tomatoes, tomato sauce, and water bring to a boil and reduce heat to a simmer. Cover and simmer for at least 2 hours, 3 is better.

Add the canned beans and cook covered for 20 minutes to heat through.

Serve over in bowls over rice and topped with sour cream, shredded cheese, sliced green onions and chopped cilantro.

Friday, May 6, 2011

Black Bean and Cheese Enchiladas

Even though we consume probably more than our share of meat in this house I do like to throw in a vegetarian meal from time to time. Most of the time those vegetarian meals are well received.  However from time to time I come up with a recipe that the kids more than like; they absolutely love. This is one of those recipes. No one ever misses the meat when we serve this either so it is great for everyone. The combination of the black beans, mushrooms and cumin gives this dish a wonderful satisfying flavor.

I use green enchilada sauce in this recipe because that is the version we prefer, if you prefer the red sauce feel free to substitute it.


Black Bean and Cheese Enchiladas


1 Tablespoon vegetable oil
2 medium onions, chopped
1 cup chopped mushrooms
2 teaspoons ground cumin
a generous pinch of salt
1 (15 oz0 can black beans, drained and rinsed
8 (8”) flour tortillas (heated)
2 ½ cups Mexican blend shredded cheese (jack cheese, cheddar and sometimes other cheeses are included)
1 (10 oz) can green enchilada sauce

Heat oven to 350 degrees Fahrenheit
Spray a 13”x9” baking dish with non-stick spray

Heat oil in a medium skillet over medium heat; add the onions, mushrooms, cumin, and a generous pinch of salt. Cook until the veggies are softened, stir in the drained beans and allow to cool a bit.

Use about 3 Tablespoons of the bean mixture and ¼ cup of the cheese to fill each tortilla. Roll the tortillas around the filling and place in baking dish seam side down.

Spoon enchilada sauce over the top of enchiladas in baking dish.
Cover with foil and bake for 30 to 35 minutes or until hot and bubbly.
Sprinkle remaining ½ cheese over top and serve.